Trustless Swap
This guide is rated as advanced.
You can expect advanced guides to take 2 hours or more of dedicated time. The length of time necessary to fully understand some of the concepts raised in this guide might increase this estimate.
You can view the complete source code for this app example in the Sui repository.
This guide demonstrates how to make an app that performs atomic swaps on Sui. Atomic swaps are similar to escrows but without requiring a trusted third party.
There are three main sections to this guide:
- Smart Contracts: The Move code that holds the state and perform the swaps.
- Backend: A service that indexes chain state to discover trades, and an API service to read this data.
- Frontend: A UI that enables users to list objects for sale and to accept trades.
What the guide teaches
- Shared objects: The guide teaches you how to use shared objects, in this case to act as the escrow between two Sui users wanting to trade. Shared objects are a unique concept to Sui. Any transaction and any signer can modify it, given the changes meet the requirements set forth by the package that defined the type.
- Composability: The guide teaches you how to design your Move code in a way that enables full composability. In this app, the Move code that handles trading is completely unaware of the code that defines the objects it is trading and vice versa.
The guide also shows how to build an app that:
- Is trustless: Users do not have to trust (or pay) any third parties; the chain manages the swap.
- Avoids rug-pulls: Guarantees that the object a user wants to trade for isn't tampered with after initiating the trade.
- Preserves liveness: Users are able to pull out of the trade and reclaim their object at any time, in case the other party stops responding.
What you need
Before getting started, make sure you have:
- Installed the latest version of Sui.
- Configured a valid network environment, as the guide has you deploy the module on Testnet.
- Acquired Devnet or Testnet tokens for development purposes.
- Read the basics of shared versus owned objects.
Directory structure
To begin, create a new folder on your system titled trading that holds all your files. Inside that folder, create three more folders: api, contracts, and frontend. It's important to keep this directory structure as some helper scripts in this example target these directories by name. Different projects have their own directory structure, but it's common to split code into functional groups to help with maintenance.
- You have the latest version of Sui installed. If you run
sui --versionin your terminal or console, it responds with the currently installed version. - Your active environment is pointing to the expected network. Run
sui client active-envto make sure. If you receive a warning about a client and server API version mismatch, update Sui using the version in the relevant branch (mainnet,testnet,devent) of the Sui repo. - Your active address has SUI. Run
sui client balancein your terminal or console. If there is no balance, acquire SUI from the faucet (not available in Mainnet). - You have a directory to place the files you create in. The suggested names of the directories are important if you use the available helper functions later in the guide.
Smart contracts
In this part of the guide, you write the Move contracts that perform the trustless swaps. The first step is to set up a Move package for storing your Move modules. The guide describes how to create the package from scratch, but you can use a fork or copy of the example code in the Sui repo to follow along instead.
Move.toml
To begin writing your smart contracts, create an escrow folder in your contracts folder (if using recommended directory names). Create a file inside the folder named Move.toml and copy the following code into it. This is the package manifest file. If you want to learn more about the structure of the file, see Package Manifest in The Move Book.
If you are targeting a network other than Testnet, be sure to update the rev value for the Sui dependency.
[package]
name = "escrow"
version = "0.0.1"
edition = "2024.beta"

[dependencies]
Sui = { git = "https://github.com/MystenLabs/sui.git", subdir = "crates/sui-framework/packages/sui-framework", rev = "framework/testnet" }

[addresses]
escrow = "0x0"
Locked and Key
With your manifest file in place, it's time to start creating the Move assets for this project. In your escrow folder, at the same level as your Move.toml file, create a sources folder. This is the common file structure of a package in Move. Create a new file inside sources titled lock.move. This file contains the logic that locks the object involved in a trade. The complete source code for this file follows and the sections that come after detail its components.
Click the titles at the top of codeblocks to open the relevant source file in GitHub.
lock.move
lock.movemodule escrow::lock {
use sui::{
event,
dynamic_object_field::{Self as dof}
};
public struct LockedObjectKey has copy, store, drop {}
public struct Locked<phantom T: key + store> has key, store {
    id: UID,
    key: ID,
}

public struct Key has key, store { id: UID }
const ELockKeyMismatch: u64 = 0;
public fun lock<T: key + store>(
    obj: T,
    ctx: &mut TxContext,
): (Locked<T>, Key) {
    let key = Key { id: object::new(ctx) };
    let mut lock = Locked {
        id: object::new(ctx),
        key: object::id(&key),
    };

    event::emit(LockCreated {
        lock_id: object::id(&lock),
        key_id: object::id(&key),
        creator: ctx.sender(),
        item_id: object::id(&obj)
    });

    dof::add(&mut lock.id, LockedObjectKey {}, obj);

    (lock, key)
}
public fun unlock<T: key + store>(mut locked: Locked<T>, key: Key): T {
    assert!(locked.key == object::id(&key), ELockKeyMismatch);
    let Key { id } = key;
    id.delete();

    let obj = dof::remove<LockedObjectKey, T>(&mut locked.id, LockedObjectKey {});

    event::emit(LockDestroyed { lock_id: object::id(&locked) });

    let Locked { id, key: _ } = locked;
    id.delete();
    obj
}
public struct LockCreated has copy, drop {
lock_id: ID,
key_id: ID,
creator: address,
item_id: ID,
}
public struct LockDestroyed has copy, drop {
lock_id: ID
}
#[test_only] use sui::coin::{Self, Coin};
#[test_only] use sui::sui::SUI;
#[test_only] use sui::test_scenario::{Self as ts, Scenario};

#[test_only]
fun test_coin(ts: &mut Scenario): Coin<SUI> {
    coin::mint_for_testing<SUI>(42, ts.ctx())
}
#[test]
fun test_lock_unlock() {
    let mut ts = ts::begin(@0xA);
    let coin = test_coin(&mut ts);

    let (lock, key) = lock(coin, ts.ctx());
    let coin = lock.unlock(key);

    coin.burn_for_testing();
    ts.end();
}
#[test]
#[expected_failure(abort_code = ELockKeyMismatch)]
fun test_lock_key_mismatch() {
    let mut ts = ts::begin(@0xA);
    let coin = test_coin(&mut ts);
    let another_coin = test_coin(&mut ts);
    let (l, _k) = lock(coin, ts.ctx());
    let (_l, k) = lock(another_coin, ts.ctx());

    let _key = l.unlock(k);
    abort 1337
}
}
After a trade is initiated, you don't want the trading party to modify the object they agreed to trade. Imagine you're trading in-game items and you agree to trade a weapon with all its attachments, and its owner strips all its attachments just before the trade.
In a traditional trade, a third party typically holds the items in escrow to make sure they are not tampered with before the trade completes. This requires either trusting that the third party won't tamper with it themselves, paying the third party to ensure that doesn't happen, or both.
In a trustless swap, however, you can use the safety properties of Move to force an item's owner to prove that they have not tampered with the version of the object that you agreed to trade, without involving anyone else.
This is done by requiring that an object that is available for trading is locked with a single-use key, and asking the owner to supply the key when finalizing the trade.
To tamper with the object would require unlocking it, which consumes the key. Consequently, there would no longer be a key to finish the trade.
public struct Locked<phantom T: key + store> has key, store {
id: UID,
key: ID,
}
public struct Key has key, store { id: UID }
- The
Locked<T>type stores theIDof the key that unlocks it, and its ownid. The object being locked is added as a dynamic object field, so that it is still readable at its own ID off chain. - The corresponding
Keytype only stores its ownid.
The lock and key are made single-use by the signatures of the lock and unlock functions. lock accepts any object of type T: store (the store ability is necessary for storing it inside a Locked<T>), and creates both the Locked<T> and its corresponding Key:
lock function in lock.move
lock function in lock.movepublic fun lock<T: key + store>(
obj: T,
ctx: &mut TxContext,
): (Locked<T>, Key) {
let key = Key { id: object::new(ctx) };
let mut lock = Locked {
id: object::new(ctx),
key: object::id(&key),
};
event::emit(LockCreated {
lock_id: object::id(&lock),
key_id: object::id(&key),
creator: ctx.sender(),
item_id: object::id(&obj)
});
dof::add(&mut lock.id, LockedObjectKey {}, obj);
(lock, key)
}
The unlock function accepts the Locked<T> and Key by value (which consumes them), and returns the underlying T as long as the correct key has been supplied for the lock:
unlock function in lock.move
unlock function in lock.moveconst ELockKeyMismatch: u64 = 0;
public fun unlock<T: key + store>(mut locked: Locked<T>, key: Key): T {
assert!(locked.key == object::id(&key), ELockKeyMismatch);
let Key { id } = key;
id.delete();
let obj = dof::remove<LockedObjectKey, T>(&mut locked.id, LockedObjectKey {});
event::emit(LockDestroyed { lock_id: object::id(&locked) });
let Locked { id, key: _ } = locked;
id.delete();
obj
}
Together, they ensure that a lock and key cannot have existed before the lock operation, and will not exist after a successful unlock – it is single use.
- Move Package defined in The Move Book.
- Concepts: Wrapped Objects
Testing Locked and Key
Move's type system guarantees that a given Key cannot be re-used (because unlock accepts it by value), but there are some properties that need to be confirmed with tests:
- A locked object can be unlocked with its key.
- Trying to unlock an object with the wrong key fails.
The test starts with a helper function for creating an object, it doesn't matter what kind of object it is, as long as it has the store ability. The test uses Coin<SUI>, because it comes with a #[test_only] function for minting:
#[test_only] use sui::coin::{Self, Coin};
#[test_only] use sui::sui::SUI;
#[test_only] use sui::test_scenario::{Self as ts, Scenario};
#[test_only]
fun test_coin(ts: &mut Scenario): Coin<SUI> {
coin::mint_for_testing<SUI>(42, ts.ctx())
}
- All test-related functions and imports are annotated with
#[test_only]to make sure they don't show up in the published package. This can also be done by separating tests into their own module – e.g.lock_tests.move– and marking that module as#[test_only]. - The
test_scenariomodule is used to provide access to a&mut TxContextin the test (necessary for creating new objects). Tests that don't need to simulate multiple transactions but still need access to aTxContextcan usesui::tx_context::dummyto create a test context instead.
The first test works by creating an object to test, locking it and unlocking it – this should finish executing without aborting.
The last two lines exist to keep the Move compiler happy by cleaning up the test coin and test scenario objects, because values in Move are not implicitly cleaned up unless they have the drop ability.
#[test]
fun test_lock_unlock() {
let mut ts = ts::begin(@0xA);
let coin = test_coin(&mut ts);
let (lock, key) = lock(coin, ts.ctx());
let coin = lock.unlock(key);
coin.burn_for_testing();
ts.end();
}
The other test is testing a failure scenario – that an abort happens. It creates two locked objects (this time the values are just u64s), and use the key from one to try and unlock the other, which should fail (specified using the expected_failure attribute).
Unlike the previous test, the same clean up is not needed, because the code is expected to terminate. Instead, add another abort after the code that you expect to abort (making sure to use a different code for this second abort).
#[test]
#[expected_failure(abort_code = ELockKeyMismatch)]
fun test_lock_key_mismatch() {
let mut ts = ts::begin(@0xA);
let coin = test_coin(&mut ts);
let another_coin = test_coin(&mut ts);
let (l, _k) = lock(coin, ts.ctx());
let (_l, k) = lock(another_coin, ts.ctx());
let _key = l.unlock(k);
abort 1337
}
- Concepts: Test Scenario
- Drop ability defined in The Move Book.
- [Testing] Move code discussion in The Move Book.
At this point, you have
- A Move package consisting of a manifest file (
Move.toml) - A
lock.movefile in yoursourcesfolder.
From your escrow folder, run sui move test in your terminal or console. If successful, you get a response similar to the following that confirms the package builds and your tests pass:
INCLUDING DEPENDENCY Sui
INCLUDING DEPENDENCY MoveStdlib
BUILDING escrow
Running Move unit tests
[ PASS    ] escrow::lock::test_lock_key_mismatch
[ PASS    ] escrow::lock::test_lock_unlock
Test result: OK. Total tests: 2; passed: 2; failed: 0
You might notice that the Move compiler creates a build subfolder inside escrow upon a successful build. This folder contains your package's compiled bytecode, code from your package's dependencies, and various other files necessary for the build. At this point, it's enough to just be aware of these files. You don't need to fully understand the contents in build.
The Escrow protocol
Create a new file in your escrow folder titled shared.move. The code in this file creates the shared Escrow object and completes the trading logic. The complete source code for this file follows and the sections that come after detail its components.
shared.move
shared.movemodule escrow::shared {
use sui::{
event,
dynamic_object_field::{Self as dof}
};
use escrow::lock::{Locked, Key};
public struct EscrowedObjectKey has copy, store, drop {}
public struct Escrow<phantom T: key + store> has key, store {
    id: UID,
    sender: address,
    recipient: address,
    exchange_key: ID,
}
const EMismatchedSenderRecipient: u64 = 0;
const EMismatchedExchangeObject: u64 = 1;
public fun create<T: key + store>(
escrowed: T,
exchange_key: ID,
recipient: address,
ctx: &mut TxContext
) {
let mut escrow = Escrow<T> {
id: object::new(ctx),
sender: ctx.sender(),
recipient,
exchange_key,
};
event::emit(EscrowCreated {
escrow_id: object::id(&escrow),
key_id: exchange_key,
sender: escrow.sender,
recipient,
item_id: object::id(&escrowed),
});
dof::add(&mut escrow.id, EscrowedObjectKey {}, escrowed);
transfer::public_share_object(escrow);
}
public fun swap<T: key + store, U: key + store>(
mut escrow: Escrow<T>,
key: Key,
locked: Locked<U>,
ctx: &TxContext,
): T {
let escrowed = dof::remove<EscrowedObjectKey, T>(&mut escrow.id, EscrowedObjectKey {});
let Escrow {
id,
sender,
recipient,
exchange_key,
} = escrow;
assert!(recipient == ctx.sender(), EMismatchedSenderRecipient);
assert!(exchange_key == object::id(&key), EMismatchedExchangeObject);
transfer::public_transfer(locked.unlock(key), sender);
event::emit(EscrowSwapped {
escrow_id: id.to_inner(),
});
id.delete();
escrowed
}
public fun return_to_sender<T: key + store>(
    mut escrow: Escrow<T>,
    ctx: &TxContext
): T {

    event::emit(EscrowCancelled {
        escrow_id: object::id(&escrow)
    });

    let escrowed = dof::remove<EscrowedObjectKey, T>(&mut escrow.id, EscrowedObjectKey {});

    let Escrow {
        id,
        sender,
        recipient: _,
        exchange_key: _,
    } = escrow;

    assert!(sender == ctx.sender(), EMismatchedSenderRecipient);
    id.delete();
    escrowed
}
public struct EscrowCreated has copy, drop {
escrow_id: ID,
key_id: ID,
sender: address,
recipient: address,
item_id: ID,
}
public struct EscrowSwapped has copy, drop {
escrow_id: ID
}
public struct EscrowCancelled has copy, drop {
escrow_id: ID
}
#[test_only] use sui::coin::{Self, Coin};
#[test_only] use sui::sui::SUI;
#[test_only] use sui::test_scenario::{Self as ts, Scenario};
#[test_only] use escrow::lock;
#[test_only] const ALICE: address = @0xA;
#[test_only] const BOB: address = @0xB;
#[test_only] const DIANE: address = @0xD;
#[test_only]
fun test_coin(ts: &mut Scenario): Coin<SUI> {
coin::mint_for_testing<SUI>(42, ts.ctx())
}
#[test]
fun test_successful_swap() {
let mut ts = ts::begin(@0x0);
let (i2, ik2) = {
ts.next_tx(BOB);
let c = test_coin(&mut ts);
let cid = object::id(&c);
let (l, k) = lock::lock(c, ts.ctx());
let kid = object::id(&k);
transfer::public_transfer(l, BOB);
transfer::public_transfer(k, BOB);
(cid, kid)
};
let i1 = {
ts.next_tx(ALICE);
let c = test_coin(&mut ts);
let cid = object::id(&c);
create(c, ik2, BOB, ts.ctx());
cid
};
{
ts.next_tx(BOB);
let escrow: Escrow<Coin<SUI>> = ts.take_shared();
let k2: Key = ts.take_from_sender();
let l2: Locked<Coin<SUI>> = ts.take_from_sender();
let c = escrow.swap(k2, l2, ts.ctx());
transfer::public_transfer(c, BOB);
};
ts.next_tx(@0x0);
{
let c: Coin<SUI> = ts.take_from_address_by_id(ALICE, i2);
ts::return_to_address(ALICE, c);
};
{
let c: Coin<SUI> = ts.take_from_address_by_id(BOB, i1);
ts::return_to_address(BOB, c);
};
ts::end(ts);
}
#[test]
#[expected_failure(abort_code = EMismatchedSenderRecipient)]
fun test_mismatch_sender() {
let mut ts = ts::begin(@0x0);
let ik2 = {
ts.next_tx(DIANE);
let c = test_coin(&mut ts);
let (l, k) = lock::lock(c, ts.ctx());
let kid = object::id(&k);
transfer::public_transfer(l, DIANE);
transfer::public_transfer(k, DIANE);
kid
};
{
ts.next_tx(ALICE);
let c = test_coin(&mut ts);
create(c, ik2, BOB, ts.ctx());
};
{
ts.next_tx(DIANE);
let escrow: Escrow<Coin<SUI>> = ts.take_shared();
let k2: Key = ts.take_from_sender();
let l2: Locked<Coin<SUI>> = ts.take_from_sender();
let c = escrow.swap(k2, l2, ts.ctx());
transfer::public_transfer(c, DIANE);
};
abort 1337
}
#[test]
#[expected_failure(abort_code = EMismatchedExchangeObject)]
fun test_mismatch_object() {
let mut ts = ts::begin(@0x0);
{
ts.next_tx(BOB);
let c = test_coin(&mut ts);
let (l, k) = lock::lock(c, ts.ctx());
transfer::public_transfer(l, BOB);
transfer::public_transfer(k, BOB);
};
{
ts.next_tx(ALICE);
let c = test_coin(&mut ts);
let cid = object::id(&c);
create(c, cid, BOB, ts.ctx());
};
{
ts.next_tx(BOB);
let escrow: Escrow<Coin<SUI>> = ts.take_shared();
let k2: Key = ts.take_from_sender();
let l2: Locked<Coin<SUI>> = ts.take_from_sender();
let c = escrow.swap(k2, l2, ts.ctx());
transfer::public_transfer(c, BOB);
};
abort 1337
}
#[test]
#[expected_failure(abort_code = EMismatchedExchangeObject)]
fun test_object_tamper() {
let mut ts = ts::begin(@0x0);
let ik2 = {
ts.next_tx(BOB);
let c = test_coin(&mut ts);
let (l, k) = lock::lock(c, ts.ctx());
let kid = object::id(&k);
transfer::public_transfer(l, BOB);
transfer::public_transfer(k, BOB);
kid
};
{
ts.next_tx(ALICE);
let c = test_coin(&mut ts);
create(c, ik2, BOB, ts.ctx());
};
{
ts.next_tx(BOB);
let k: Key = ts.take_from_sender();
let l: Locked<Coin<SUI>> = ts.take_from_sender();
let mut c = lock::unlock(l, k);
let _dust = c.split(1, ts.ctx());
let (l, k) = lock::lock(c, ts.ctx());
let escrow: Escrow<Coin<SUI>> = ts.take_shared();
let c = escrow.swap(k, l, ts.ctx());
transfer::public_transfer(c, BOB);
};
abort 1337
}
#[test]
fun test_return_to_sender() {
let mut ts = ts::begin(@0x0);
let cid = {
ts.next_tx(ALICE);
let c = test_coin(&mut ts);
let cid = object::id(&c);
let i = object::id_from_address(@0x0);
create(c, i, BOB, ts.ctx());
cid
};
{
ts.next_tx(ALICE);
let escrow: Escrow<Coin<SUI>> = ts.take_shared();
let c = escrow.return_to_sender(ts.ctx());
transfer::public_transfer(c, ALICE);
};
ts.next_tx(@0x0);
{
let c: Coin<SUI> = ts.take_from_address_by_id(ALICE, cid);
ts::return_to_address(ALICE, c)
};
ts::end(ts);
}
#[test]
#[expected_failure]
fun test_return_to_sender_failed_swap() {
let mut ts = ts::begin(@0x0);
let ik2 = {
ts.next_tx(BOB);
let c = test_coin(&mut ts);
let (l, k) = lock::lock(c, ts.ctx());
let kid = object::id(&k);
transfer::public_transfer(l, BOB);
transfer::public_transfer(k, BOB);
kid
};
{
ts.next_tx(ALICE);
let c = test_coin(&mut ts);
create(c, ik2, BOB, ts.ctx());
};
{
ts.next_tx(ALICE);
let escrow: Escrow<Coin<SUI>> = ts.take_shared();
let c = escrow.return_to_sender(ts.ctx());
transfer::public_transfer(c, ALICE);
};
{
ts.next_tx(BOB);
let escrow: Escrow<Coin<SUI>> = ts.take_shared();
let k2: Key = ts.take_from_sender();
let l2: Locked<Coin<SUI>> = ts.take_from_sender();
let c = escrow.swap(k2, l2, ts.ctx());
transfer::public_transfer(c, BOB);
};
abort 1337
}
}
Trading proceeds in three steps:
- The first party locks the object they want to trade – this is already handled by the
lockmodule you wrote earlier. - The second party puts their object up for escrow and registers their interest in the first party's object. This is handled by a new module –
escrow. - The first party completes the trade by providing their locked object and the key to unlock it. Assuming all checks pass, this transfers their object to the second party and makes the second party's object available to them.
You can start by implementing steps two and three, by defining a new type to hold the escrowed object. It holds the escrowed object and an id: UID (because it's an object in its own right), but it also records the sender and intended recipient (to confirm they match when the trade happens), and it registers interest in the first party's object by recording the ID of the key that unlocks the Locked<U> that contains the object.
public struct Escrow<phantom T: key + store> has key, store {
id: UID,
sender: address,
recipient: address,
exchange_key: ID,
}
You also need to create a function for creating the Escrow object. The object is shared because it needs to be accessed by the address that created it (in case the object needs to be returned) and by the intended recipient (to complete the swap).
create function in shared.move
create function in shared.movepublic fun create<T: key + store>(
escrowed: T,
exchange_key: ID,
recipient: address,
ctx: &mut TxContext
) {
let mut escrow = Escrow<T> {
id: object::new(ctx),
sender: ctx.sender(),
recipient,
exchange_key,
};
dof::add(&mut escrow.id, EscrowedObjectKey {}, escrowed);
transfer::public_share_object(escrow);
}
If the second party stops responding, the first party can unlock their object. You need to create a function so the second party can recover their object in the symmetric case as well.
- It needs to check that the caller matches
sender, becauseEscrowobjects are shared and anybody can access them. - It accepts the
Escrowby value so that it can clean it up after extracting the escrowed object, reclaiming the storage rebate for the sender and cleaning up an unused object on chain.
return_to_sender function in shared.move
return_to_sender function in shared.movepublic fun return_to_sender<T: key + store>(
mut escrow: Escrow<T>,
ctx: &TxContext
): T {
event::emit(EscrowCancelled {
escrow_id: object::id(&escrow)
});
let escrowed = dof::remove<EscrowedObjectKey, T>(&mut escrow.id, EscrowedObjectKey {});
let Escrow {
id,
sender,
recipient: _,
exchange_key: _,
} = escrow;
assert!(sender == ctx.sender(), EMismatchedSenderRecipient);
id.delete();
escrowed
}
Finally, you need to add a function to allow the first party to complete the trade.
- This function also accepts the
Escrowby value because it consumes it after the swap is complete. - It checks that the sender of the transaction is the intended recipient (the first party), and that the ID of the key that they provided matches the key specified when the object was escrowed. This ensures no tampering occurs, because this key can be provided only if it had not been used to unlock the object, which proves the object has not left its
Locked<U>between the call tocreateand toswap. You can inspect thelockmodule to see that it cannot be modified while in there. - The call to
unlockfurther checks that the key matches the locked object that was provided. - Instead of transferring the escrowed object to the recipient address, it is returned by the
swapfunction. You can do this because you checked that the transaction sender is the recipient, and it makes this API more composable. Programmable transaction blocks (PTBs) provide the flexibility to decide whether to transfer the object as it is received or do something else with it.
swap function in shared.move
swap function in shared.moveconst EMismatchedSenderRecipient: u64 = 0;
const EMismatchedExchangeObject: u64 = 1;
public fun swap<T: key + store, U: key + store>(
    mut escrow: Escrow<T>,
    key: Key,
    locked: Locked<U>,
    ctx: &TxContext,
): T {
    let escrowed = dof::remove<EscrowedObjectKey, T>(&mut escrow.id, EscrowedObjectKey {});

    let Escrow {
        id,
        sender,
        recipient,
        exchange_key,
    } = escrow;

    assert!(recipient == ctx.sender(), EMismatchedSenderRecipient);
    assert!(exchange_key == object::id(&key), EMismatchedExchangeObject);

    transfer::public_transfer(locked.unlock(key), sender);

    event::emit(EscrowSwapped {
        escrow_id: id.to_inner(),
    });

    id.delete();

    escrowed
}
- Full source code
- Concepts: Shared Objects
- Concepts: Shared Object Deletion
- Concepts: PTBs
Testing
Tests for the escrow module are more involved than for lock – as they take advantage of test_scenario's ability to simulate multiple transactions from different senders, and interact with shared objects.
The guide focuses on the test for a successful swap, but you can find a link to all the tests later on.
As with the lock test, start by creating a function to mint a test coin. You also create some constants to represent our transaction senders, ALICE, BOB, and DIANE.
#[test_only] use sui::coin::{Self, Coin};
#[test_only] use sui::sui::SUI;
#[test_only] use sui::test_scenario::{Self as ts, Scenario};

#[test_only] use escrow::lock;

#[test_only] const ALICE: address = @0xA;
#[test_only] const BOB: address = @0xB;
#[test_only] const DIANE: address = @0xD;

#[test_only]
fun test_coin(ts: &mut Scenario): Coin<SUI> {
    coin::mint_for_testing<SUI>(42, ts.ctx())
}
The test body starts with a call to test_scenario::begin and ends with a call to test_scenario::end. It doesn't matter which address you pass to begin, because you pick one of ALICE or BOB at the start of each new transaction you write, so set it to @0x0:
#[test]
fun test_successful_swap() {
    let mut ts = ts::begin(@0x0);

    // Rest of the test ...

    ts::end(ts);
}
The first transaction is from BOB who creates a coin and locks it. You must remember the ID of the coin and the ID of the key, which you will need later, and then you transfer the locked object and the key itself to BOB, because this is what would happen in a real transaction: When simulating transactions in a test, you should only keep around primitive values, not whole objects, which would need to be written to chain between transactions.
Write these transactions inside the test_successful_swap function, between the call to begin and end.
let (i2, ik2) = {
    ts.next_tx(BOB);
    let c = test_coin(&mut ts);
    let cid = object::id(&c);
    let (l, k) = lock::lock(c, ts.ctx());
    let kid = object::id(&k);
    transfer::public_transfer(l, BOB);
    transfer::public_transfer(k, BOB);
    (cid, kid)
};
Next, ALICE comes along and sets up the Escrow, which locks their coin. They register their interest for BOB's coin by referencing BOB's key's ID (ik2):
let i1 = {
    ts.next_tx(ALICE);
    let c = test_coin(&mut ts);
    let cid = object::id(&c);
    create(c, ik2, BOB, ts.ctx());
    cid
};
Finally, BOB completes the trade by calling swap. The take_shared function is used to simulate accepting a shared input. It uses type inference to know that the object must be an Escrow, and finds the last object of this type that was shared (by ALICE in the previous transaction). Similarly, use take_from_sender to simulate accepting owned inputs (in this case, BOB's lock and key). The coin returned by swap is transferred back to BOB, as if it was called as part of a PTB, followed by a transfer command.
{
    ts.next_tx(BOB);
    let escrow: Escrow<Coin<SUI>> = ts.take_shared();
    let k2: Key = ts.take_from_sender();
    let l2: Locked<Coin<SUI>> = ts.take_from_sender();
    let c = escrow.swap(k2, l2, ts.ctx());

    transfer::public_transfer(c, BOB);
};
The rest of the test is designed to check that ALICE has BOB's coin and vice versa. It starts by calling next_tx to make sure the effects of the previous transaction have been committed, before running the necessary checks.
ts.next_tx(@0x0);

{
    let c: Coin<SUI> = ts.take_from_address_by_id(ALICE, i2);
    ts::return_to_address(ALICE, c);
};

{
    let c: Coin<SUI> = ts.take_from_address_by_id(BOB, i1);
    ts::return_to_address(BOB, c);
};
- Guides: Test Scenario
Observability
The escrow Move package is now functional: You could publish it on chain and perform trustless swaps by creating transactions. Creating those transactions requires knowing the IDs of Locked, Key, and Escrow objects.
Locked and Key objects are typically owned by the transaction sender, and so can be queried through the Sui RPC, but Escrow objects are shared, and it is useful to be able to query them by their sender and recipient (so that users can see the trades they have offered and received).
Querying Escrow objects by their sender or recipient requires custom indexing, and to make it easy for the indexer to spot relevant transactions, add the following events to escrow.move:
public struct EscrowCreated has copy, drop {
    escrow_id: ID,
    key_id: ID,
    sender: address,
    recipient: address,
    item_id: ID,
}

public struct EscrowSwapped has copy, drop {
    escrow_id: ID
}

public struct EscrowCancelled has copy, drop {
    escrow_id: ID
}
Functions responsible for various aspects of the escrow's lifecycle emit these events. The custom indexer can then subscribe to transactions that emit these events and process only those, rather than the entire chain state:
emit events included in functions from shared.move
emit events included in functions from shared.moveuse sui::{
event,
dynamic_object_field::{Self as dof}
};
public fun create<T: key + store>(
    escrowed: T,
    exchange_key: ID,
    recipient: address,
    ctx: &mut TxContext
) {
    let mut escrow = Escrow<T> {
        id: object::new(ctx),
        sender: ctx.sender(),
        recipient,
        exchange_key,
    };
    event::emit(EscrowCreated {
        escrow_id: object::id(&escrow),
        key_id: exchange_key,
        sender: escrow.sender,
        recipient,
        item_id: object::id(&escrowed),
    });

    dof::add(&mut escrow.id, EscrowedObjectKey {}, escrowed);

    transfer::public_share_object(escrow);
}

public fun swap<T: key + store, U: key + store>(
    mut escrow: Escrow<T>,
    key: Key,
    locked: Locked<U>,
    ctx: &TxContext,
): T {
    let escrowed = dof::remove<EscrowedObjectKey, T>(&mut escrow.id, EscrowedObjectKey {});

    let Escrow {
        id,
        sender,
        recipient,
        exchange_key,
    } = escrow;

    assert!(recipient == ctx.sender(), EMismatchedSenderRecipient);
    assert!(exchange_key == object::id(&key), EMismatchedExchangeObject);

    transfer::public_transfer(locked.unlock(key), sender);

    event::emit(EscrowSwapped {
        escrow_id: id.to_inner(),
    });

    id.delete();

    escrowed
}

public fun return_to_sender<T: key + store>(
    mut escrow: Escrow<T>,
    ctx: &TxContext
): T {

    event::emit(EscrowCancelled {
        escrow_id: object::id(&escrow)
    });

    let escrowed = dof::remove<EscrowedObjectKey, T>(&mut escrow.id, EscrowedObjectKey {});

    let Escrow {
        id,
        sender,
        recipient: _,
        exchange_key: _,
    } = escrow;

    assert!(sender == ctx.sender(), EMismatchedSenderRecipient);
    id.delete();
    escrowed
}
- Concepts: Events
You now have shared.move and locked.move files in your sources folder. From the parent escrow folder, run sui move test in your terminal or console. If successful, you get a response similar to the following that confirms the package builds and your tests pass:
INCLUDING DEPENDENCY Sui
INCLUDING DEPENDENCY MoveStdlib
BUILDING escrow
Running Move unit tests
[ PASS    ] escrow::lock::test_lock_key_mismatch
[ PASS    ] escrow::shared::test_mismatch_object
[ PASS    ] escrow::lock::test_lock_unlock
[ PASS    ] escrow::shared::test_mismatch_sender
[ PASS    ] escrow::shared::test_object_tamper
[ PASS    ] escrow::shared::test_return_to_sender
[ PASS    ] escrow::shared::test_return_to_sender_failed_swap
[ PASS    ] escrow::shared::test_successful_swap
Test result: OK. Total tests: 8; passed: 8; failed: 0
Next steps
Well done. You have written the Move package! 🚀
To turn this into a complete dApp, you need to create a frontend. However, for the frontend to be updated, it has to listen to the blockchain as escrows are made and swaps are fulfilled.
To achieve this, in the next step you create an indexing service.
Backend indexer
With the contract adapted to emit events, you can now write an indexer that keeps track of all active Escrow objects and exposes an API for querying objects by sender or recipient.
The indexer is backed by a Prisma DB with the following schema:
schema.prisma
schema.prisma// This is your Prisma schema file,
// learn more about it in the docs: https://pris.ly/d/prisma-schema
generator client {
provider = "prisma-client-js"
}
/// We can setup the provider to our database
/// For this DEMO, we're using sqlite, which allows us to not
/// have external dependencies.
datasource db {
provider = "sqlite"
url = "file:./dev.db"
}
/// Our `Locked` objects list
model Locked {
// Keeping an ID so we can use as a pagination cursor
// There's an issue with BigInt for sqlite, so we're using a plain ID.
id Int @id @default(autoincrement())
objectId String @unique
keyId String?
creator String?
itemId String?
deleted Boolean @default(false)
@@index([creator])
@@index([deleted])
}
/// Our swap objects list
model Escrow {
// Keeping an ID so we can use as a pagination cursor
// There's an issue with BigInt for sqlite, so we're using a plain ID.
id Int @id @default(autoincrement())
objectId String @unique
sender String?
recipient String?
keyId String?
itemId String?
swapped Boolean @default(false)
cancelled Boolean @default(false)
@@index([recipient])
@@index([sender])
}
/// Saves the latest cursor for a given key.
model Cursor {
id String @id
eventSeq String
txDigest String
}
The core of the indexer is an event loop, initialized in a function called setupListeners.
import { setupListeners } from './indexer/event-indexer';

setupListeners();
The indexer queries events related to the escrow module, using a queryEvent filter, and keeps track of a cursor representing the latest event it has processed so it can resume indexing from the right place even if it is restarted. The filter is looking for any events whose type is from the escrow module of the Move package (see the event-indexer.ts code that follows).
The core event job works by polling: It queries RPC for events following its latest cursor and sends them to a callback for processing. If it detects more than one page of new events, it immediately requests the next page. Otherwise, the job waits for the next polling interval before checking again.
event-indexer.ts
event-indexer.tsimport { EventId, SuiClient, SuiEvent, SuiEventFilter } from '@mysten/sui/client';
import { CONFIG } from '../config';
import { prisma } from '../db';
import { getClient } from '../sui-utils';
import { handleEscrowObjects } from './escrow-handler';
import { handleLockObjects } from './locked-handler';
type SuiEventsCursor = EventId | null | undefined;
type EventExecutionResult = {
cursor: SuiEventsCursor;
hasNextPage: boolean;
};
type EventTracker = {
// The module that defines the type, with format `package::module`
type: string;
filter: SuiEventFilter;
callback: (events: SuiEvent[], type: string) => any;
};
const EVENTS_TO_TRACK: EventTracker[] = [
{
type: `${CONFIG.SWAP_CONTRACT.packageId}::lock`,
filter: {
MoveEventModule: {
module: 'lock',
package: CONFIG.SWAP_CONTRACT.packageId,
},
},
callback: handleLockObjects,
},
{
type: `${CONFIG.SWAP_CONTRACT.packageId}::shared`,
filter: {
MoveEventModule: {
module: 'shared',
package: CONFIG.SWAP_CONTRACT.packageId,
},
},
callback: handleEscrowObjects,
},
];
const executeEventJob = async (
client: SuiClient,
tracker: EventTracker,
cursor: SuiEventsCursor,
): Promise<EventExecutionResult> => {
try {
// get the events from the chain.
// For this implementation, we are going from start to finish.
// This will also allow filling in a database from scratch!
const { data, hasNextPage, nextCursor } = await client.queryEvents({
query: tracker.filter,
cursor,
order: 'ascending',
});
// handle the data transformations defined for each event
await tracker.callback(data, tracker.type);
// We only update the cursor if we fetched extra data (which means there was a change).
if (nextCursor && data.length > 0) {
await saveLatestCursor(tracker, nextCursor);
return {
cursor: nextCursor,
hasNextPage,
};
}
} catch (e) {
console.error(e);
}
// By default, we return the same cursor as passed in.
return {
cursor,
hasNextPage: false,
};
};
const runEventJob = async (client: SuiClient, tracker: EventTracker, cursor: SuiEventsCursor) => {
const result = await executeEventJob(client, tracker, cursor);
// Trigger a timeout. Depending on the result, we either wait 0ms or the polling interval.
setTimeout(
() => {
runEventJob(client, tracker, result.cursor);
},
result.hasNextPage ? 0 : CONFIG.POLLING_INTERVAL_MS,
);
};
/**
* Gets the latest cursor for an event tracker, either from the DB (if it's undefined)
* or from the running cursors.
*/
const getLatestCursor = async (tracker: EventTracker) => {
const cursor = await prisma.cursor.findUnique({
where: {
id: tracker.type,
},
});
return cursor || undefined;
};
/**
* Saves the latest cursor for an event tracker to the db, so we can resume
* from there.
* */
const saveLatestCursor = async (tracker: EventTracker, cursor: EventId) => {
const data = {
eventSeq: cursor.eventSeq,
txDigest: cursor.txDigest,
};
return prisma.cursor.upsert({
where: {
id: tracker.type,
},
update: data,
create: { id: tracker.type, ...data },
});
};
/// Sets up all the listeners for the events we want to track.
/// They are polling the RPC endpoint every second.
export const setupListeners = async () => {
for (const event of EVENTS_TO_TRACK) {
runEventJob(getClient(CONFIG.NETWORK), event, await getLatestCursor(event));
}
};
The callback is responsible for reading the event and updating the database accordingly. For demo purposes, SQLite is being used, and so you need to issue a separate UPSERT to the database for each escrowed object. In a production setting, however, you would want to batch requests to the database to optimize data flow.
escrow-handler.ts
escrow-handler.tsimport { SuiEvent } from '@mysten/sui/client';
import { Prisma } from '@prisma/client';
import { prisma } from '../db';
type EscrowEvent = EscrowCreated | EscrowCancelled | EscrowSwapped;
type EscrowCreated = {
sender: string;
recipient: string;
escrow_id: string;
key_id: string;
item_id: string;
};
type EscrowSwapped = {
escrow_id: string;
};
type EscrowCancelled = {
escrow_id: string;
};
/**
* Handles all events emitted by the `escrow` module.
* Data is modelled in a way that allows writing to the db in any order (DESC or ASC) without
* resulting in data incosistencies.
* We're constructing the updates to support multiple events involving a single record
* as part of the same batch of events (but using a single write/record to the DB).
* */
export const handleEscrowObjects = async (events: SuiEvent[], type: string) => {
const updates: Record<string, Prisma.EscrowCreateInput> = {};
for (const event of events) {
if (!event.type.startsWith(type)) throw new Error('Invalid event module origin');
const data = event.parsedJson as EscrowEvent;
if (!Object.hasOwn(updates, data.escrow_id)) {
updates[data.escrow_id] = {
objectId: data.escrow_id,
};
}
// Escrow cancellation case
if (event.type.endsWith('::EscrowCancelled')) {
const data = event.parsedJson as EscrowCancelled;
updates[data.escrow_id].cancelled = true;
continue;
}
// Escrow swap case
if (event.type.endsWith('::EscrowSwapped')) {
const data = event.parsedJson as EscrowSwapped;
updates[data.escrow_id].swapped = true;
continue;
}
const creationData = event.parsedJson as EscrowCreated;
// Handle creation event
updates[data.escrow_id].sender = creationData.sender;
updates[data.escrow_id].recipient = creationData.recipient;
updates[data.escrow_id].keyId = creationData.key_id;
updates[data.escrow_id].itemId = creationData.item_id;
}
// As part of the demo and to avoid having external dependencies, we use SQLite as our database.
// Prisma + SQLite does not support bulk insertion & conflict handling, so we have to insert these 1 by 1
// (resulting in multiple round-trips to the database).
// Always use a single `bulkInsert` query with proper `onConflict` handling in production databases (e.g Postgres)
const promises = Object.values(updates).map((update) =>
prisma.escrow.upsert({
where: {
objectId: update.objectId,
},
create: update,
update,
}),
);
await Promise.all(promises);
};
- Full source code
- Reference: JSON-RPC
API service
The data that the indexer captures can then be served over an API, so that a frontend can read it. Follow the next section to implement the API in TypeScript, to run on Node, using Express.
Query parameters
You want your API to accept the query string in the URL as the parameters for database WHERE query. Hence, you want a utility that can extract and parse the URL query string into valid query parameters for Prisma. With the parseWhereStatement() function, the callers filter the set of keys from the URL query string and transforms those corresponding key-value pairs into the correct format for Prisma.
parseWhereStatement in api-queries.ts
parseWhereStatement in api-queries.tsexport enum WhereParamTypes {
STRING,
NUMBER,
BOOLEAN,
}
export type WhereParam = {
  key: string;
  type: WhereParamTypes;
};
/** Parses a where statement based on the query params. */
export const parseWhereStatement = (query: Record<string, any>, acceptedParams: WhereParam[]) => {
  const params: Record<string, any> = {};
  for (const key of Object.keys(query)) {
    const whereParam = acceptedParams.find((x) => x.key === key);
    if (!whereParam) continue;

    const value = query[key];
    if (whereParam.type === WhereParamTypes.STRING) {
      params[key] = value;
    }
    if (whereParam.type === WhereParamTypes.NUMBER) {
      const number = Number(value);
      if (isNaN(number)) throw new Error(`Invalid number for ${key}`);

      params[key] = number;
    }

    // Handle boolean expected values.
    if (whereParam.type === WhereParamTypes.BOOLEAN) {
      let boolValue;
      if (value === 'true') boolValue = true;
      else if (value === 'false') boolValue = false;
      else throw new Error(`Invalid boolean for ${key}`);

      params[key] = boolValue;
    }
  }
  return params;
};
Query pagination
Pagination is another crucial part to ensure your API returns sufficient and/or ordered chunk of information instead of all the data that might be the vector for a DDOS attack. Similar to WHERE parameters, define a set of keys in the URL query string to be accepted as valid pagination parameters. The parsePaginationForQuery() utility function helps to achieve this by filtering the pre-determined keys sort, limit, cursor and parsing corresponding key-value pairs into ApiPagination that Prisma can consume.
In this example, the id field of the model in the database as the cursor that allows clients to continue subsequent queries with the next page.
parsePaginationForQuery in api-queries.ts
parsePaginationForQuery in api-queries.tsexport type ApiPagination = {
take?: number;
orderBy: {
id: 'asc' | 'desc';
};
cursor?: {
id: number;
};
skip?: number;
};
/**
 * A helper to prepare pagination based on `req.query`.
 * We are doing only primary key cursor + ordering for this example.
 */
export const parsePaginationForQuery = (body: Record<string, any>) => {
  const pagination: ApiPagination = {
    orderBy: {
      id: Object.hasOwn(body, 'sort') && ['asc', 'desc'].includes(body.sort) ? body.sort : 'desc',
    },
  };

  // Prepare pagination limit (how many items to return)
  if (Object.hasOwn(body, 'limit')) {
    const requestLimit = Number(body.limit);

    if (isNaN(requestLimit)) throw new Error('Invalid limit value');

    pagination.take = requestLimit > CONFIG.DEFAULT_LIMIT ? CONFIG.DEFAULT_LIMIT : requestLimit;
  } else {
    pagination.take = CONFIG.DEFAULT_LIMIT;
  }

  // Prepare cursor pagination (which page to return)
  if (Object.hasOwn(body, 'cursor')) {
    const cursor = Number(body.cursor);
    if (isNaN(cursor)) throw new Error('Invalid cursor');
    pagination.skip = 1;
    pagination.cursor = {
      id: cursor,
    };
  }

  return pagination;
};
API endpoints
All the endpoints are defined in server.ts, particularly, there are two endpoints:
/lockedto queryLockedobjects./escrowsto queryEscrowobjects.
You define a list of valid query keys, such as deleted, creator, keyId, and objectId for Locked data and cancelled, swapped, recipient, and sender for Escrow data. Pass the URL query string into the pre-defined utilities to output the correct parameters that Prisma can use.
server.ts
server.tsimport cors from 'cors';
import express from 'express';
import { prisma } from './db';
import {
formatPaginatedResponse,
parsePaginationForQuery,
parseWhereStatement,
WhereParam,
WhereParamTypes,
} from './utils/api-queries';
const app = express();
app.use(cors());
app.use(express.json());
app.get('/', async (req, res) => {
return res.send({ message: '🚀 API is functional 🚀' });
});
app.get('/locked', async (req, res) => {
const acceptedQueries: WhereParam[] = [
{
key: 'deleted',
type: WhereParamTypes.BOOLEAN,
},
{
key: 'creator',
type: WhereParamTypes.STRING,
},
{
key: 'keyId',
type: WhereParamTypes.STRING,
},
{
key: 'objectId',
type: WhereParamTypes.STRING,
},
];
try {
const locked = await prisma.locked.findMany({
where: parseWhereStatement(req.query, acceptedQueries)!,
...parsePaginationForQuery(req.query),
});
return res.send(formatPaginatedResponse(locked));
} catch (e) {
console.error(e);
return res.status(400).send(e);
}
});
app.get('/escrows', async (req, res) => {
const acceptedQueries: WhereParam[] = [
{
key: 'cancelled',
type: WhereParamTypes.BOOLEAN,
},
{
key: 'swapped',
type: WhereParamTypes.BOOLEAN,
},
{
key: 'recipient',
type: WhereParamTypes.STRING,
},
{
key: 'sender',
type: WhereParamTypes.STRING,
},
];
try {
const escrows = await prisma.escrow.findMany({
where: parseWhereStatement(req.query, acceptedQueries)!,
...parsePaginationForQuery(req.query),
});
return res.send(formatPaginatedResponse(escrows));
} catch (e) {
console.error(e);
return res.status(400).send(e);
}
});
app.listen(3000, () => console.log(`🚀 Server ready at: http://localhost:3000`));
Deployment
Now that you have an indexer and an API service, you can deploy your move package and start the indexer and API service.
-
Install dependencies by running
pnpm install --ignore-workspaceoryarn install --ignore-workspace. -
Setup the database by running
pnpm db:setup:devoryarn db:setup:dev. -
Deploy the Sui package
Deployment instructions
See Publish a Package for a more detailed guide on publishing packages or Sui Client CLI for a complete reference of client commands in the Sui CLI.
Before publishing your code, you must first initialize the Sui Client CLI, if you haven't already. To do so, in a terminal or console at the root directory of the project enter sui client. If you receive the following response, complete the remaining instructions:
Config file ["<FILE-PATH>/.sui/sui_config/client.yaml"] doesn't exist, do you want to connect to a Sui Full node server [y/N]?
Enter y to proceed. You receive the following response:
Sui Full node server URL (Defaults to Sui Devnet if not specified) :
Leave this blank (press Enter). You receive the following response:
Select key scheme to generate keypair (0 for ed25519, 1 for secp256k1, 2: for secp256r1):
Select 0. Now you should have a Sui address set up.
Next, configure the Sui CLI to use testnet as the active environment.
Use the following command to list your available environments:
sui client envs
If you haven't already set up a testnet environment, do so by running the following command in a terminal or console:
sui client new-env --alias testnet --rpc https://fullnode.testnet.sui.io:443
Run the following command to activate the testnet environment:
sui client switch --env testnet
Before being able to publish your package to Testnet, you need Testnet SUI tokens. To get some, run the following command:
sui client faucet
For other ways to get SUI in your Testnet account, see Get SUI Tokens.
Now that you have an account with some Testnet SUI, you can deploy your contracts.
There are some helper functions to publish the smart contracts so you can create some demo data (for Testnet). The helper function to publish the smart contrqcts expects built smart contracts in both the escrow and demo directories. Run sui move build in both directories, if necessary. Be sure to update the Sui dependency in the manifest to point to the correct source based on your environment.
To publish the smart contracts and produce demo data:
-
Publish the smart contracts by running the following command from your
apifolder:npx ts-node helpers/publish-contracts.tsIf successful,
demo-contract.jsonandescrow-contract.jsonare created in the backend root directory. These files contain the contract addresses and are used by the backend and frontend to interact with the contracts. -
Produce demo non-locked and locked objects
npx ts-node helpers/create-demo-data.ts -
Produce demo escrows
npx ts-node helpers/create-demo-escrows.ts
If you want to reset the database (for a clean demo, for example), run pnpm db:reset:dev && pnpm db:setup:dev or yarn db:reset:dev && yarn db:setup:dev.
-
Run both the API and the indexer by running
pnpm devoryarn dev. -
Visit http://localhost:3000/escrows or http://localhost:3000/locked
You should now have an indexer running.
- If you visit
localhost:3000, you get a message that the service is running:{"message":"🚀 API is functional 🚀"}. - If you visit
localhost:3000/escrows, you see the demo escrow data the helper scripts created for you. Likewise, visitinghttp://localhost:3000/lockeddisplays the raw JSON the script created for demo objects.
Next steps
With the code successfully deployed on Testnet, you can now create a frontend to display the trading data and to allow users to interact with the Move modules.
Frontend
In this final part of the app example, you build a frontend (UI) that allows end users to discover trades and interact with listed escrows.
Prerequisites
You can view the complete source code for this app example in the Sui repository.
Before getting started, make sure you have:
- Completed the smart contracts and understand their design.
- Implemented the backend to learn how to index on-chain data and expose it through an API.
- Deployed your smart contracts and started the backend indexer.
- Installed
pnpmoryarnto use as the package manager.
- Tooling: Sui Typescript SDK. For basic usage on how to interact with Sui with TypeScript.
- Tooling: Sui dApp Kit. To learn basic building blocks for developing a dApp in the Sui ecosystem with React.js.
- Tooling:
@mysten/dapp. This is used within this project to quickly scaffold a React-based Sui dApp.
Overview
The UI design consists of three parts:
- A header containing the button allowing users to connect their wallet and navigate to other pages.
- A place for users to manage their owned objects to be ready for escrow trading called
Manage Objects. - A place for users to discover, create, and execute trades called
Escrows.
Scaffold a new app
The first step is to set up the client app. Run the following command to scaffold a new app from your frontend folder.
- PNPM
- Yarn
pnpm create @mysten/dapp --template react-client-dapp
yarn create @mysten/dapp --template react-client-dapp
When asked for a name for your dApp, provide one of your liking. The dApp scaffold gets created in a new directory with the name you provide. This is convenient to keep your working code separate from the example source code that might already populate this folder. The codeblocks that follow point to the code in the default example location. Be aware the path to your own code includes the dApp name you provide.
Setting up import aliases
First, set up import aliases to make the code more readable and maintainable. This allows you to import files using @/ instead of relative paths.
Replace the content of tsconfig.json with the following:
tsconfig.json with the following:{
"compilerOptions": {
"target": "ES2020",
"useDefineForClassFields": true,
"lib": ["ES2020", "DOM", "DOM.Iterable"],
"module": "ESNext",
"skipLibCheck": true,
/* Bundler mode */
"moduleResolution": "bundler",
"allowImportingTsExtensions": true,
"resolveJsonModule": true,
"isolatedModules": true,
"noEmit": true,
"jsx": "react-jsx",
/* Linting */
"strict": true,
"noUnusedLocals": true,
"noUnusedParameters": true,
"noFallthroughCasesInSwitch": true,
"baseUrl": ".",
"paths": {
"@/*": ["./src/*"]
}
},
"include": ["src"]
}
The paths option under compilerOptions is what defines the aliasing for TypeScript. Here, the alias @/* is mapped to the ./src/* directory, meaning that any time you use @/, TypeScript resolves it as a reference to the src folder. This setup reduces the need for lengthy relative paths when importing files in your project.
Replace the content of vite.config.ts with the following:
vite.config.ts with the following:import { defineConfig } from "vite";
import react from "@vitejs/plugin-react-swc";
// https://vitejs.dev/config/
export default defineConfig({
plugins: [react()],
resolve: {
alias: {
"@": "/src",
},
},
});
Vite also needs to be aware of the aliasing to resolve imports correctly during the build process. In the resolve.alias configuration of vite.config.ts, we map the alias @ to the /src directory.
Adding Tailwind CSS
To streamline the styling process and keep the codebase clean and maintainable, this guide uses Tailwind CSS, which provides utility-first CSS classes to rapidly build custom designs. Run the following command from the base of your dApp project to add Tailwind CSS and its dependencies:
- PNPM
- Yarn
pnpm add tailwindcss@latest postcss@latest autoprefixer@latest
yarn add tailwindcss@latest postcss@latest autoprefixer@latest
Next, generate the Tailwind CSS configuration file by running the following:
npx tailwindcss init -p
Replace the content of tailwind.config.js with the following:
tailwind.config.js with the following:// eslint-disable-next-line import/no-anonymous-default-export
export default {
content: ["./index.html", "./src/**/*.{js,ts,jsx,tsx}"],
theme: {
extend: {},
},
plugins: [],
};
Add the src/styles/ directory and add base.css:
src/styles/ directory and add base.css:@tailwind base;
@tailwind components;
@tailwind utilities;
.connect-wallet-wrapper > button {
@apply !bg-transparent !shadow-none !flex-shrink-0 !py-2 !px-3 !text-sm;
}
.sui-object-card .rt-CardInner {
@apply flex flex-col justify-between;
}
Connecting your deployed package
First, deploy your package via the scripts in the api directory.
Then, create a src/constants.ts file and fill it with the following:
src/constants.ts file and fill it with the following:// You can choose a different env (e.g. using a .env file, or a predefined list)
/** @ts-ignore */
import demoContract from "../../api/demo-contract.json";
/** @ts-ignore */
import escrowContract from "../../api/escrow-contract.json";
export enum QueryKey {
Locked = "locked",
Escrow = "escrow",
GetOwnedObjects = "getOwnedObjects",
}
export const CONSTANTS = {
escrowContract: {
...escrowContract,
lockedType: `${escrowContract.packageId}::lock::Locked`,
lockedKeyType: `${escrowContract.packageId}::lock::Key`,
lockedObjectDFKey: `${escrowContract.packageId}::lock::LockedObjectKey`,
},
demoContract: {
...demoContract,
demoBearType: `${demoContract.packageId}::demo_bear::DemoBear`,
},
apiEndpoint: "http://localhost:3000/",
};
If you create a dApp using a project name so that your src files are in a subfolder of frontend, be sure to add another nesting level (../) to the import statements.
Add helper functions and UI components
Create a src/utils/ directory and add the following file:
src/utils/ directory and add the following file:/**
* Takes an object of { key: value } and builds a URL param string.
* e.g. { page: 1, limit: 10 } -> ?page=1&limit=10
*/
export const constructUrlSearchParams = (
object: Record<string, string>,
): string => {
const searchParams = new URLSearchParams();
for (const key in object) {
searchParams.set(key, object[key]);
}
return `?${searchParams.toString()}`;
};
/** Checks whether we have a next page */
export const getNextPageParam = (lastPage: any) => {
if ("api" in lastPage) {
return lastPage.api.cursor;
}
return lastPage.cursor;
};
Create a src/components/ directory and add the following components:
ExplorerLink.tsx
ExplorerLink.tsximport { useSuiClientContext } from "@mysten/dapp-kit";
import { formatAddress } from "@mysten/sui/utils";
import { CheckIcon, CopyIcon } from "@radix-ui/react-icons";
import { useState } from "react";
import toast from "react-hot-toast";
/**
* A re-usable component for explorer links that offers
* a copy to clipboard functionality.
*/
export function ExplorerLink({
id,
isAddress,
}: {
id: string;
isAddress?: boolean;
}) {
const [copied, setCopied] = useState(false);
const { network } = useSuiClientContext();
const link = `https://suiexplorer.com/${
isAddress ? "address" : "object"
}/${id}?network=${network}`;
const copy = () => {
navigator.clipboard.writeText(id);
setCopied(true);
setTimeout(() => {
setCopied(false);
}, 2000);
toast.success("Copied to clipboard!");
};
return (
<span className="flex items-center gap-3">
{copied ? (
<CheckIcon />
) : (
<CopyIcon
height={12}
width={12}
className="cursor-pointer"
onClick={copy}
/>
)}
<a href={link} target="_blank" rel="noreferrer">
{formatAddress(id)}
</a>
</span>
);
}
InfiniteScrollArea.tsx
InfiniteScrollArea.tsximport { Button } from "@radix-ui/themes";
import { ReactNode, useEffect, useRef } from "react";
import { Loading } from "./Loading";
/**
* An infinite scroll area that calls `loadMore()` when the user scrolls to the bottom.
* Helps build easy infinite scroll areas for paginated data.
*/
export function InfiniteScrollArea({
children,
loadMore,
loading = false,
hasNextPage,
gridClasses = "py-6 grid-cols-1 md:grid-cols-2 gap-5",
}: {
children: ReactNode | ReactNode[];
loadMore: () => void;
loading: boolean;
hasNextPage: boolean;
gridClasses?: string;
}) {
const observerTarget = useRef(null);
// implement infinite loading.
useEffect(() => {
const observer = new IntersectionObserver(
(entries) => {
if (entries[0].isIntersecting) {
loadMore();
}
},
{ threshold: 1 },
);
if (observerTarget.current) {
observer.observe(observerTarget.current);
}
return () => {
if (observerTarget.current) {
// eslint-disable-next-line react-hooks/exhaustive-deps
observer.unobserve(observerTarget.current);
}
};
}, [observerTarget, loadMore]);
if (!children || (Array.isArray(children) && children.length === 0))
return <div className="p-3">No results found.</div>;
return (
<>
<div className={`grid ${gridClasses}`}>{children}</div>
<div className="col-span-2 text-center">
{loading && <Loading />}
{hasNextPage && !loading && (
<Button
ref={observerTarget}
color="gray"
className="cursor-pointer"
onClick={loadMore}
disabled={!hasNextPage || loading}
>
Load more...
</Button>
)}
</div>
</>
);
}
Loading.tsx
Loading.tsx/**
* A loading spinner that can be re-used across the app.
*/
export function Loading() {
return (
<div role="status" className="text-center ">
<svg
aria-hidden="true"
className="w-8 h-8 text-gray-200 animate-spin fill-gray-900 mx-auto my-3"
viewBox="0 0 100 101"
fill="none"
xmlns="http://www.w3.org/2000/svg"
>
<path
d="M100 50.5908C100 78.2051 77.6142 100.591 50 100.591C22.3858 100.591 0 78.2051 0 50.5908C0 22.9766 22.3858 0.59082 50 0.59082C77.6142 0.59082 100 22.9766 100 50.5908ZM9.08144 50.5908C9.08144 73.1895 27.4013 91.5094 50 91.5094C72.5987 91.5094 90.9186 73.1895 90.9186 50.5908C90.9186 27.9921 72.5987 9.67226 50 9.67226C27.4013 9.67226 9.08144 27.9921 9.08144 50.5908Z"
fill="currentColor"
/>
<path
d="M93.9676 39.0409C96.393 38.4038 97.8624 35.9116 97.0079 33.5539C95.2932 28.8227 92.871 24.3692 89.8167 20.348C85.8452 15.1192 80.8826 10.7238 75.2124 7.41289C69.5422 4.10194 63.2754 1.94025 56.7698 1.05124C51.7666 0.367541 46.6976 0.446843 41.7345 1.27873C39.2613 1.69328 37.813 4.19778 38.4501 6.62326C39.0873 9.04874 41.5694 10.4717 44.0505 10.1071C47.8511 9.54855 51.7191 9.52689 55.5402 10.0491C60.8642 10.7766 65.9928 12.5457 70.6331 15.2552C75.2735 17.9648 79.3347 21.5619 82.5849 25.841C84.9175 28.9121 86.7997 32.2913 88.1811 35.8758C89.083 38.2158 91.5421 39.6781 93.9676 39.0409Z"
fill="currentFill"
/>
</svg>
<span className="sr-only">Loading...</span>
</div>
);
}
SuiObjectDisplay.tsx
SuiObjectDisplay.tsximport { SuiObjectData } from "@mysten/sui/client";
import { Avatar, Box, Card, Flex, Inset, Text } from "@radix-ui/themes";
import { ReactNode } from "react";
import { ExplorerLink } from "./ExplorerLink";
/**
* A Card component to view an object's Display (from on-chain data).
* It includes a label on the top right of the card that can be styled.
*
* It also allows for children to be passed in, which will be displayed
* below the object's display in a footer-like design.
*
*/
export function SuiObjectDisplay({
object,
children,
label,
labelClasses,
}: {
object?: SuiObjectData;
children?: ReactNode | ReactNode[];
label?: string;
labelClasses?: string;
}) {
const display = object?.display?.data;
return (
<Card className="!p-0 sui-object-card">
{label && (
<div className={`absolute top-0 right-0 m-2 ${labelClasses}`}>
{label}
</div>
)}
<Flex gap="3" align="center">
<Avatar size="6" src={display?.image_url} radius="full" fallback="O" />
<Box className="grid grid-cols-1">
<Text className="text-xs">
<ExplorerLink id={object?.objectId || ""} isAddress={false} />
</Text>
<Text as="div" size="2" weight="bold">
{display?.name || display?.title || "-"}
</Text>
<Text as="div" size="2" color="gray">
{display?.description || "No description for this object."}
</Text>
</Box>
</Flex>
{children && (
<Inset className="p-2 border-t mt-3 bg-gray-100 rounded-none">
{children}
</Inset>
)}
</Card>
);
}
Install the necessary dependencies:
- PNPM
- Yarn
pnpm add react-hot-toast
yarn add react-hot-toast
Set up routing
The imported template only has a single page. To add more pages, you need to set up routing.
First, install the necessary dependencies:
- PNPM
- Yarn
pnpm add react-router-dom
yarn add react-router-dom
Then, create a src/routes/ directory and add index.tsx. This file contains the routing configuration:
src/routes/ directory and add index.tsx. This file contains the routing configuration:import { createBrowserRouter, Navigate } from "react-router-dom";
import { Root } from "./root";
import { LockedDashboard } from "@/routes/LockedDashboard";
import { EscrowDashboard } from "@/routes/EscrowDashboard";
export const router = createBrowserRouter([
{
path: "/",
element: <Root />,
children: [
{
path: "/",
element: <Navigate to="escrows" replace />,
},
{
path: "escrows",
element: <EscrowDashboard />,
},
{
path: "locked",
element: <LockedDashboard />,
},
],
},
]);
Add the following respective files to the src/routes/ directory:
root.tsx. This file contains the root component that is rendered on every page:
root.tsx. This file contains the root component that is rendered on every page:import { Toaster } from "react-hot-toast";
import { Outlet } from "react-router-dom";
import { Header } from "@/components/Header";
import { Container } from "@radix-ui/themes";
export function Root() {
return (
<div>
<Toaster position="bottom-center" />
<Header />
<Container py="8">
<Outlet />
</Container>
</div>
);
}
LockedDashboard.tsx. This file contains the component for the Manage Objects page.
LockedDashboard.tsx. This file contains the component for the Manage Objects page.export function LockedDashboard() {
return (
<div>
<h1>Locked Dashboard</h1>
</div>
)
}
EscrowDashboard.tsx. This file contains the component for the Escrows page.
EscrowDashboard.tsx. This file contains the component for the Escrows page.export function EscrowDashboard() {
return (
<div>
<h1>Escrow Dashboard</h1>
</div>
)
}
Update src/main.tsx by replacing the App component with the RouterProvider and replace "dark" with "light" in the Theme component:
src/main.tsx by replacing the App component with the RouterProvider and replace "dark" with "light" in the Theme component:import React from "react";
import ReactDOM from "react-dom/client";
import "@mysten/dapp-kit/dist/index.css";
import "@radix-ui/themes/styles.css";
import "./styles/base.css";
import { getFullnodeUrl } from "@mysten/sui/client";
import {
SuiClientProvider,
WalletProvider,
createNetworkConfig,
} from "@mysten/dapp-kit";
import { QueryClient, QueryClientProvider } from "@tanstack/react-query";
import { Theme } from "@radix-ui/themes";
import { router } from "@/routes/index.tsx";
import { RouterProvider } from "react-router-dom";
const queryClient = new QueryClient();
const { networkConfig } = createNetworkConfig({
localnet: { url: getFullnodeUrl("localnet") },
devnet: { url: getFullnodeUrl("devnet") },
testnet: { url: getFullnodeUrl("testnet") },
mainnet: { url: getFullnodeUrl("mainnet") },
});
ReactDOM.createRoot(document.getElementById("root")!).render(
<React.StrictMode>
<Theme appearance="light">
<QueryClientProvider client={queryClient}>
<SuiClientProvider networks={networkConfig} defaultNetwork="testnet">
<WalletProvider autoConnect>
<RouterProvider router={router} />
</WalletProvider>
</SuiClientProvider>
</QueryClientProvider>
</Theme>
</React.StrictMode>,
);
Note that dApp Kit provides a set of hooks for making query and mutation calls to the Sui blockchain. These hooks are thin wrappers around query and mutation hooks from @tanstack/react-query.
- Docs: React Router. Used to navigate between different routes in the website.
- Docs: TanStack Query.
Create src/components/Header.tsx. This file contains the navigation links and the connect wallet button:
src/components/Header.tsx. This file contains the navigation links and the connect wallet button:import { ConnectButton } from "@mysten/dapp-kit";
import { SizeIcon } from "@radix-ui/react-icons";
import { Box, Container, Flex, Heading } from "@radix-ui/themes";
import { NavLink } from "react-router-dom";
const menu = [
{
title: "Escrows",
link: "/escrows",
},
{
title: "Manage Objects",
link: "/locked",
},
];
export function Header() {
return (
<Container>
<Flex
position="sticky"
px="4"
py="2"
justify="between"
className="border-b flex flex-wrap"
>
<Box>
<Heading className="flex items-center gap-3">
<SizeIcon width={24} height={24} />
Trading Demo
</Heading>
</Box>
<Box className="flex gap-5 items-center">
{menu.map((item) => (
<NavLink
key={item.link}
to={item.link}
className={({ isActive, isPending }) =>
`cursor-pointer flex items-center gap-2 ${
isPending
? "pending"
: isActive
? "font-bold text-blue-600"
: ""
}`
}
>
{item.title}
</NavLink>
))}
</Box>
<Box className="connect-wallet-wrapper">
<ConnectButton />
</Box>
</Flex>
</Container>
);
}
The dApp Kit comes with a pre-built React.js component called ConnectButton displaying a button to connect and disconnect a wallet. The connecting and disconnecting wallet logic is handled seamlessly so you don't need to worry about repeating yourself doing the same logic all over again.
At this point, you have a basic routing setup. Run your app and ensure you can:
- Navigate between the
Manage ObjectsandEscrowspages. - Connect and disconnect your wallet.
Note, the styles should be applied. The Header component should look like this:

Type definitions
All the type definitions are in src/types/types.ts. Create this file and add the following:
src/types/types.ts. Create this file and add the following:export type ApiLockedObject = {
id?: string;
objectId: string;
keyId: string;
creator?: string;
itemId: string;
deleted: boolean;
};
export type ApiEscrowObject = {
id: string;
objectId: string;
sender: string;
recipient: string;
keyId: string;
itemId: string;
swapped: boolean;
cancelled: boolean;
};
export type EscrowListingQuery = {
escrowId?: string;
sender?: string;
recipient?: string;
cancelled?: string;
swapped?: string;
limit?: string;
};
export type LockedListingQuery = {
deleted?: string;
keyId?: string;
limit?: string;
};
ApiLockedObject and ApiEscrowObject represent the Locked and Escrow indexed data model the indexing and API service return.
EscrowListingQuery and LockedListingQuery are the query parameters model to provide to the API service to fetch from the endpoints /escrow and /locked accordingly.
Display owned objects
Now, display the objects owned by the connected wallet address. This is the Manage Objects page.
First add this file src/components/locked/LockOwnedObjects.tsx:
src/components/locked/LockOwnedObjects.tsx:import { useCurrentAccount, useSuiClientInfiniteQuery } from "@mysten/dapp-kit";
import { SuiObjectDisplay } from "@/components/SuiObjectDisplay";
import { InfiniteScrollArea } from "@/components/InfiniteScrollArea";
/**
* A component that fetches all the objects owned by the connected wallet address
* and allows the user to lock them, so they can be used in escrow.
*/
export function LockOwnedObjects() {
const account = useCurrentAccount();
const { data, fetchNextPage, isFetchingNextPage, hasNextPage, refetch } =
useSuiClientInfiniteQuery(
"getOwnedObjects",
{
owner: account?.address!,
options: {
showDisplay: true,
showType: true,
},
},
{
enabled: !!account,
select: (data) =>
data.pages
.flatMap((page) => page.data)
.filter(
// we're filtering out objects that don't have Display or image_url
// for demo purposes. The Escrow contract works with all objects.
(x) => !!x.data?.display && !!x.data?.display?.data?.image_url,
),
},
);
return (
<InfiniteScrollArea
loadMore={() => fetchNextPage()}
hasNextPage={hasNextPage}
loading={isFetchingNextPage}
>
{data?.map((obj) => (
<SuiObjectDisplay object={obj.data!}>
</SuiObjectDisplay>
))}
</InfiniteScrollArea>
);
}
Fetch the owned objects directly from Sui blockchain using the useSuiClientInfiniteQuery() hook from dApp Kit. This hook is a thin wrapper around Sui blockchain RPC calls, reference the documentation to learn more about these RPC hooks. Basically, supply the RPC endpoint you want to execute, in this case it's the getOwnedObjects endpoint. Supply the connected wallet account as the owner. The returned data is stored inside the cache at query key getOwnedObjects. In a future step you invalidate this cache after a mutation succeeds, so the data will be re-fetched automatically.
Next, update src/routes/LockedDashboard.tsx to include the LockOwnedObjects component:
src/routes/LockedDashboard.tsx to include the LockOwnedObjects component:import { useState } from "react";
import { Tabs } from "@radix-ui/themes";
import { LockOwnedObjects } from "@/components/locked/LockOwnedObjects";
export function LockedDashboard() {
const tabs = [
{
name: "Lock Owned objects",
component: () => <LockOwnedObjects />,
},
];
const [tab, setTab] = useState(tabs[0].name);
return (
<Tabs.Root value={tab} onValueChange={setTab}>
<Tabs.List>
{tabs.map((tab, index) => {
return (
<Tabs.Trigger
key={index}
value={tab.name}
className="cursor-pointer"
>
{tab.name}
</Tabs.Trigger>
);
})}
</Tabs.List>
{tabs.map((tab, index) => {
return (
<Tabs.Content key={index} value={tab.name}>
{tab.component()}
</Tabs.Content>
);
})}
</Tabs.Root>
);
}
Run your app and ensure you can:
- View the owned objects of the connected wallet account.
If you don't see any objects, you might need to create some demo data or connect your wallet. You can mint objects after completing the next steps.
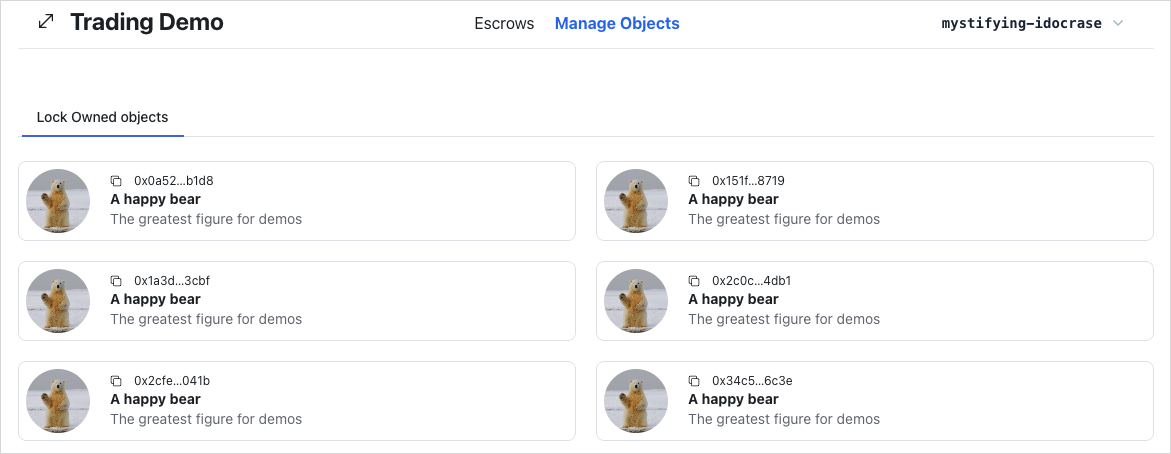
Execute transaction hook
In the frontend, you might need to execute a transaction block in multiple places, hence it's better to extract the transaction execution logic and reuse it everywhere. Let's create and examine the execute transaction hook.
Create src/hooks/useTransactionExecution.ts:
src/hooks/useTransactionExecution.ts:import { useSignTransaction, useSuiClient } from "@mysten/dapp-kit";
import { SuiTransactionBlockResponse } from "@mysten/sui/client";
import { Transaction } from "@mysten/sui/transactions";
import toast from "react-hot-toast";
/**
* A hook to execute transactions.
* It signs the transaction using the wallet and executes it through the RPC.
*
* That allows read-after-write consistency and is generally considered a best practice.
*/
export function useTransactionExecution() {
const client = useSuiClient();
const { mutateAsync: signTransactionBlock } = useSignTransaction();
const executeTransaction = async (
txb: Transaction,
): Promise<SuiTransactionBlockResponse | void> => {
try {
const signature = await signTransactionBlock({
transaction: txb,
});
const res = await client.executeTransactionBlock({
transactionBlock: signature.bytes,
signature: signature.signature,
options: {
showEffects: true,
showObjectChanges: true,
},
});
toast.success("Successfully executed transaction!");
return res;
} catch (e: any) {
toast.error(`Failed to execute transaction: ${e.message as string}`);
}
};
return executeTransaction;
}
A Transaction is the input, sign it with the current connected wallet account, execute the transaction block, return the execution result, and finally display a basic toast message to indicate whether the transaction is successful or not.
Use the useSuiClient() hook from dApp Kit to retrieve the Sui client instance configured in src/main.tsx. The useSignTransaction() function is another hook from dApp kit that helps to sign the transaction block using the currently connected wallet. It displays the UI for users to review and sign their transactions with their selected wallet. To execute a transaction block, use the executeTransaction() on the Sui client instance of the Sui TypeScript SDK.
Generate demo data
The full source code of the demo bear smart contract is available at Trading Contracts Demo directory
You need a utility function to create a dummy object representing a real world asset so you can use it to test and demonstrate escrow users flow on the UI directly.
Create src/mutations/demo.ts:
src/mutations/demo.ts:import { CONSTANTS, QueryKey } from "@/constants";
import { useTransactionExecution } from "@/hooks/useTransactionExecution";
import { useCurrentAccount } from "@mysten/dapp-kit";
import { Transaction } from "@mysten/sui/transactions";
import { useMutation, useQueryClient } from "@tanstack/react-query";
/**
* A mutation to generate demo data as part of our demo.
*/
export function useGenerateDemoData() {
const account = useCurrentAccount();
const executeTransaction = useTransactionExecution();
const queryClient = useQueryClient();
return useMutation({
mutationFn: async () => {
if (!account?.address)
throw new Error("You need to connect your wallet!");
const txb = new Transaction();
const bear = txb.moveCall({
target: `${CONSTANTS.demoContract.packageId}::demo_bear::new`,
arguments: [txb.pure.string(`A happy bear`)],
});
txb.transferObjects([bear], txb.pure.address(account.address));
return executeTransaction(txb);
},
onSuccess: () => {
queryClient.invalidateQueries({
queryKey: [QueryKey.GetOwnedObjects],
});
},
});
}
As previously mentioned, this example uses @tanstack/react-query to query, cache, and mutate server state. Server state is data only available on remote servers, and the only way to retrieve or update this data is by interacting with these remote servers. In this case, it could be from an API or directly from Sui blockchain RPC.
When you execute a transaction call to mutate data on the Sui blockchain, use the useMutation() hook. The useMutation() hook accepts several inputs, however, you only need two of them for this example. The first parameter, mutationFn, accepts the function to execute the main mutating logic, while the second parameter, onSuccess, is a callback that runs when the mutating logic succeeds.
The main mutating logic includes executing a Move call of a package named demo_bear::new to create a dummy bear object and transferring it to the connected wallet account, all within the same Transaction. This example reuses the executeTransaction() hook from the Execute Transaction Hook step to execute the transaction.
Another benefit of wrapping the main mutating logic inside useMutation() is that you can access and manipulate the cache storing server state. This example fetches the cache from remote servers by using query call in an appropriate callback. In this case, it is the onSuccess callback. When the transaction succeeds, invalidate the cache data at the cache key called getOwnedObjects, then @tanstack/react-query handles the re-fetching mechanism for the invalidated data automatically. Do this by using invalidateQueries() on the @tanstack/react-query configured client instance retrieved by useQueryClient() hook in the Set up Routing step.
Now the logic to create a dummy bear object exists. You just need to attach it into the button in the header.
Header.tsx
Header.tsximport { useGenerateDemoData } from "@/mutations/demo";
import { ConnectButton } from "@mysten/dapp-kit";
import { SizeIcon } from "@radix-ui/react-icons";
import { Box, Button, Container, Flex, Heading } from "@radix-ui/themes";
import { NavLink } from "react-router-dom";
const menu = [
{
title: "Escrows",
link: "/escrows",
},
{
title: "Manage Objects",
link: "/locked",
},
];
export function Header() {
const { mutate: demoBearMutation, isPending } = useGenerateDemoData();
return (
<Container>
<Flex
position="sticky"
px="4"
py="2"
justify="between"
className="border-b flex flex-wrap"
>
<Box>
<Heading className="flex items-center gap-3">
<SizeIcon width={24} height={24} />
Trading Demo
</Heading>
</Box>
<Box className="flex gap-5 items-center">
{menu.map((item) => (
<NavLink
key={item.link}
to={item.link}
className={({ isActive, isPending }) =>
`cursor-pointer flex items-center gap-2 ${
isPending
? "pending"
: isActive
? "font-bold text-blue-600"
: ""
}`
}
>
{item.title}
</NavLink>
))}
</Box>
<Box>
<Button
className="cursor-pointer"
disabled={isPending}
onClick={() => {
demoBearMutation();
}}
>
New Demo Bear
</Button>
</Box>
<Box className="connect-wallet-wrapper">
<ConnectButton />
</Box>
</Flex>
</Container>
);
}
Run your app and ensure you can:
- Mint a demo bear object and view it in the
Manage Objectstab.
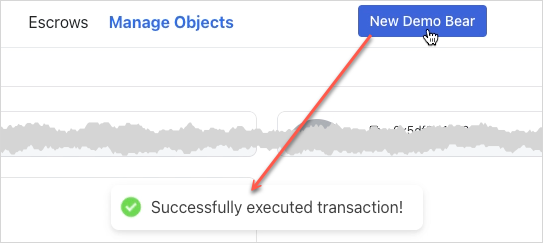
Locking owned objects
To lock the object, execute the lock Move function identified by {PACKAGE_ID}::lock::lock. The implementation is similar to what's in previous mutation functions, use useMutation() from @tanstack/react-query to wrap the main logic inside it. The lock function requires an object to be locked and its type because our smart contract lock function is generic and requires type parameters. After creating a Locked object and its Key object, transfer them to the connected wallet account within the same transaction block.
It's beneficial to extract logic of locking owned objects into a separated mutating function to enhance discoverability and encapsulation.
Create src/mutations/locked.ts:
src/mutations/locked.ts:import { CONSTANTS } from "@/constants";
import { useTransactionExecution } from "@/hooks/useTransactionExecution";
import { useCurrentAccount } from "@mysten/dapp-kit";
import { SuiObjectData } from "@mysten/sui/client";
import { Transaction } from "@mysten/sui/transactions";
import { useMutation } from "@tanstack/react-query";
/**
* Builds and executes the PTB to lock an object.
*/
export function useLockObjectMutation() {
const account = useCurrentAccount();
const executeTransaction = useTransactionExecution();
return useMutation({
mutationFn: async ({ object }: { object: SuiObjectData }) => {
if (!account?.address)
throw new Error("You need to connect your wallet!");
const txb = new Transaction();
const [locked, key] = txb.moveCall({
target: `${CONSTANTS.escrowContract.packageId}::lock::lock`,
arguments: [txb.object(object.objectId)],
typeArguments: [object.type!],
});
txb.transferObjects([locked, key], txb.pure.address(account.address));
return executeTransaction(txb);
},
});
}
Update src/components/locked/LockOwnedObjects.tsx to include the useLockObjectMutation hook:
LockOwnedObjects.tsx
LockOwnedObjects.tsximport { useCurrentAccount, useSuiClientInfiniteQuery } from "@mysten/dapp-kit";
import { SuiObjectDisplay } from "@/components/SuiObjectDisplay";
import { Button } from "@radix-ui/themes";
import { LockClosedIcon } from "@radix-ui/react-icons";
import { InfiniteScrollArea } from "@/components/InfiniteScrollArea";
import { useLockObjectMutation } from "@/mutations/locked";
/**
* A component that fetches all the objects owned by the connected wallet address
* and allows the user to lock them, so they can be used in escrow.
*/
export function LockOwnedObjects() {
const account = useCurrentAccount();
const { mutate: lockObjectMutation, isPending } = useLockObjectMutation();
const { data, fetchNextPage, isFetchingNextPage, hasNextPage, refetch } =
useSuiClientInfiniteQuery(
"getOwnedObjects",
{
owner: account?.address!,
options: {
showDisplay: true,
showType: true,
},
},
{
enabled: !!account,
select: (data) =>
data.pages
.flatMap((page) => page.data)
.filter(
// we're filtering out objects that don't have Display or image_url
// for demo purposes. The Escrow contract works with all objects.
(x) => !!x.data?.display && !!x.data?.display?.data?.image_url,
),
},
);
return (
<InfiniteScrollArea
loadMore={() => fetchNextPage()}
hasNextPage={hasNextPage}
loading={isFetchingNextPage}
>
{data?.map((obj) => (
<SuiObjectDisplay object={obj.data!}>
<div className="p-4 pt-1 text-right flex items-center justify-between">
<p className="text-sm">
Lock the item so it can be used for escrows.
</p>
<Button
className="cursor-pointer"
disabled={isPending}
onClick={() => {
lockObjectMutation(
{ object: obj.data! },
{
onSuccess: () => refetch(),
},
);
}}
>
<LockClosedIcon />
Lock Item
</Button>
</div>
</SuiObjectDisplay>
))}
</InfiniteScrollArea>
);
}
Run your app and ensure you can:
- Lock an owned object.
The object should disappear from the list of owned objects. You view and unlock locked objects in later steps.
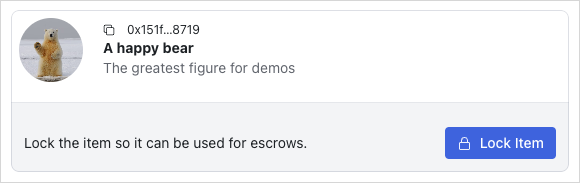
Display owned locked objects
Let's take a look at the My Locked Objects tab by examining src/components/locked/OwnedLockedList.tsx. Focus on the logic on how to retrieve this list.
OwnedLockedList.tsx
OwnedLockedList.tsximport { CONSTANTS } from "@/constants";
import { InfiniteScrollArea } from "@/components/InfiniteScrollArea";
import { useCurrentAccount, useSuiClientInfiniteQuery } from "@mysten/dapp-kit";
import { LockedObject } from "./LockedObject";
/**
* Similar to the `ApiLockedList` but fetches the owned locked objects
* but fetches the objects from the on-chain state, instead of relying on the indexer API.
*/
export function OwnedLockedList() {
const account = useCurrentAccount();
const { data, isLoading, fetchNextPage, hasNextPage, isFetchingNextPage } =
useSuiClientInfiniteQuery(
"getOwnedObjects",
{
filter: {
StructType: CONSTANTS.escrowContract.lockedType,
},
owner: account?.address!,
options: {
showContent: true,
showOwner: true,
},
},
{
enabled: !!account?.address,
select: (data) => data.pages.flatMap((page) => page.data),
},
);
return (
<>
<InfiniteScrollArea
loadMore={() => fetchNextPage()}
hasNextPage={hasNextPage}
loading={isFetchingNextPage || isLoading}
>
{data?.map((item) => (
<LockedObject key={item.data?.objectId} object={item.data!} />
))}
</InfiniteScrollArea>
</>
);
}
This instance of useSuiClientInfiniteQuery() is similar to the one in the LockOwnedObjects component. The difference is that it fetches the locked objects instead of the owned objects. The Locked object is a struct type in the smart contract, so you need to supply the struct type to the query call as a filter. The struct type is usually identified by the format of {PACKAGE_ID}::{MODULE_NAME}::{STRUCT_TYPE}.
LockedObject and Locked component
The <LockedObject /> (src/components/locked/LockedObject.tsx) component is mainly responsible for mapping an on-chain SuiObjectData Locked object to its corresponding ApiLockedObject, which is finally delegated to the <Locked /> component for rendering. The <LockedObject /> fetches the locked item object ID if the prop itemId is not supplied by using dApp Kit useSuiClientQuery() hook to call the getDynamicFieldObject RPC endpoint. Recalling that in this smart contract, the locked item is put into a dynamic object field.
LockedObject.tsx
LockedObject.tsximport { CONSTANTS } from "@/constants";
import { useSuiClientQuery } from "@mysten/dapp-kit";
import { Locked } from "./partials/Locked";
import { SuiObjectData } from "@mysten/sui/client";
/**
* Acts as a wrapper between the `Locked` object fetched from API
* and the on-chain object state.
*
* Accepts an `object` of type `::locked::Locked`, fetches the itemID (though the DOF)
* and then renders the `Locked` component.
*
* ItemId is optional because we trust the API to return the correct itemId for each Locked.
*/
export function LockedObject({
object,
itemId,
hideControls,
}: {
object: SuiObjectData;
itemId?: string;
hideControls?: boolean;
}) {
const owner = () => {
if (
!object.owner ||
typeof object.owner === "string" ||
!("AddressOwner" in object.owner)
)
return undefined;
return object.owner.AddressOwner;
};
const getKeyId = (item: SuiObjectData) => {
if (
!(item.content?.dataType === "moveObject") ||
!("key" in item.content.fields)
)
return "";
return item.content.fields.key as string;
};
// Get the itemID for the locked object (We've saved it as a DOF on the SC).
const suiObjectId = useSuiClientQuery(
"getDynamicFieldObject",
{
parentId: object.objectId,
name: {
type: CONSTANTS.escrowContract.lockedObjectDFKey,
value: {
dummy_field: false,
},
},
},
{
select: (data) => data.data,
enabled: !itemId,
},
);
return (
<Locked
locked={{
itemId: itemId || suiObjectId.data?.objectId!,
objectId: object.objectId,
keyId: getKeyId(object),
creator: owner(),
deleted: false,
}}
hideControls={hideControls}
/>
);
}
The <Locked /> (src/components/locked/partials/Locked.tsx) component is mainly responsible for rendering the ApiLockedObject. Later on, it will also consist of several on-chain interactions: unlock the locked objects and create an escrow out of the locked object.
Locked.tsx
Locked.tsximport { useCurrentAccount, useSuiClientQuery } from "@mysten/dapp-kit";
import { SuiObjectDisplay } from "@/components/SuiObjectDisplay";
import { ExplorerLink } from "../../ExplorerLink";
import { ApiLockedObject } from "@/types/types";
/**
* Prefer to use the `Locked` component only through `LockedObject`.
*
* This can also render data directly from the API, but we prefer
* to also validate ownership from on-chain state (as objects are transferrable)
* and the API cannot track all the ownership changes.
*/
export function Locked({
locked,
hideControls,
}: {
locked: ApiLockedObject;
hideControls?: boolean;
}) {
const account = useCurrentAccount();
const suiObject = useSuiClientQuery(
"getObject",
{
id: locked.itemId,
options: {
showDisplay: true,
showType: true,
showOwner: true,
},
},
{
select: (data) => data.data,
},
);
const getLabel = () => {
if (locked.deleted) return "Deleted";
if (hideControls) {
if (locked.creator === account?.address) return "You offer this";
return "You'll receive this if accepted";
}
return undefined;
};
const getLabelClasses = () => {
if (locked.deleted)
return "bg-red-50 rounded px-3 py-1 text-sm text-red-500";
if (hideControls) {
if (!!locked.creator && locked.creator === account?.address)
return "bg-blue-50 rounded px-3 py-1 text-sm text-blue-500";
return "bg-green-50 rounded px-3 py-1 text-sm text-green-700";
}
return undefined;
};
return (
<SuiObjectDisplay
object={suiObject.data!}
label={getLabel()}
labelClasses={getLabelClasses()}
>
<div className="p-4 pt-1 text-right flex flex-wrap items-center justify-between">
{
<p className="text-sm flex-shrink-0 flex items-center gap-2">
<ExplorerLink id={locked.objectId} isAddress={false} />
</p>
}
</div>
</SuiObjectDisplay>
);
}
Update src/routes/LockedDashboard.tsx to include the OwnedLockedList component:
LockedDashboard.tsx
LockedDashboard.tsximport { useState } from "react";
import { Tabs } from "@radix-ui/themes";
import { LockOwnedObjects } from "@/components/locked/LockOwnedObjects";
import { OwnedLockedList } from "@/components/locked/OwnedLockedList";
export function LockedDashboard() {
const tabs = [
{
name: "My Locked Objects",
component: () => <OwnedLockedList />,
},
{
name: "Lock Owned objects",
component: () => <LockOwnedObjects />,
},
];
const [tab, setTab] = useState(tabs[0].name);
return (
<Tabs.Root value={tab} onValueChange={setTab}>
<Tabs.List>
{tabs.map((tab, index) => {
return (
<Tabs.Trigger
key={index}
value={tab.name}
className="cursor-pointer"
>
{tab.name}
</Tabs.Trigger>
);
})}
</Tabs.List>
{tabs.map((tab, index) => {
return (
<Tabs.Content key={index} value={tab.name}>
{tab.component()}
</Tabs.Content>
);
})}
</Tabs.Root>
);
}
Run your app and ensure you can:
- View the locked objects of the connected wallet account.
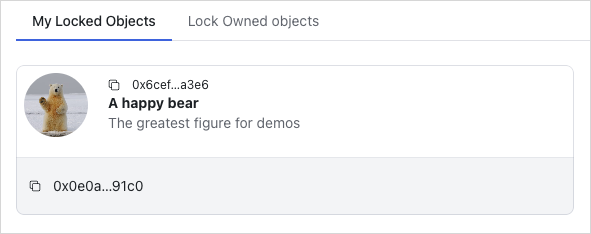
Unlocking owned objects
To unlock the object, execute the unlock Move function identified by {PACKAGE_ID}::lock::unlock. Call the unlock function supplying the Locked object, its corresponding Key, the struct type of the original object, and transfer the unlocked object to the current connected wallet account. Also, implement the onSuccess callback to invalidate the cache data at query key locked after one second to force react-query to re-fetch the data at corresponding query key automatically.
Unlocking owned objects is another crucial and complex on-chain action in this application. Hence, it's beneficial to extract its logic into separated mutating functions to enhance discoverability and encapsulation.
src/mutations/locked.ts
src/mutations/locked.tsimport { CONSTANTS, QueryKey } from "@/constants";
import { useTransactionExecution } from "@/hooks/useTransactionExecution";
import { useCurrentAccount, useSuiClient } from "@mysten/dapp-kit";
import { SuiObjectData } from "@mysten/sui/client";
import { Transaction } from "@mysten/sui/transactions";
import { useMutation, useQueryClient } from "@tanstack/react-query";
import toast from "react-hot-toast";
/**
* Builds and executes the PTB to lock an object.
*/
export function useLockObjectMutation() {
const account = useCurrentAccount();
const executeTransaction = useTransactionExecution();
return useMutation({
mutationFn: async ({ object }: { object: SuiObjectData }) => {
if (!account?.address)
throw new Error("You need to connect your wallet!");
const txb = new Transaction();
const [locked, key] = txb.moveCall({
target: `${CONSTANTS.escrowContract.packageId}::lock::lock`,
arguments: [txb.object(object.objectId)],
typeArguments: [object.type!],
});
txb.transferObjects([locked, key], txb.pure.address(account.address));
return executeTransaction(txb);
},
});
}
/**
* Builds and executes the PTB to unlock an object.
*/
export function useUnlockMutation() {
const account = useCurrentAccount();
const executeTransaction = useTransactionExecution();
const client = useSuiClient();
const queryClient = useQueryClient();
return useMutation({
mutationFn: async ({
lockedId,
keyId,
suiObject,
}: {
lockedId: string;
keyId: string;
suiObject: SuiObjectData;
}) => {
if (!account?.address)
throw new Error("You need to connect your wallet!");
const key = await client.getObject({
id: keyId,
options: {
showOwner: true,
},
});
if (
!key.data?.owner ||
typeof key.data.owner === "string" ||
!("AddressOwner" in key.data.owner) ||
key.data.owner.AddressOwner !== account.address
) {
toast.error("You are not the owner of the key");
return;
}
const txb = new Transaction();
const item = txb.moveCall({
target: `${CONSTANTS.escrowContract.packageId}::lock::unlock`,
typeArguments: [suiObject.type!],
arguments: [txb.object(lockedId), txb.object(keyId)],
});
txb.transferObjects([item], txb.pure.address(account.address));
return executeTransaction(txb);
},
onSuccess: () => {
setTimeout(() => {
// invalidating the queries after a small latency
// because the indexer works in intervals of 1s.
// if we invalidate too early, we might not get the latest state.
queryClient.invalidateQueries({
queryKey: [QueryKey.Locked],
});
}, 1_000);
},
});
}
Update src/components/locked/partials/Locked.tsx to include the useUnlockObjectMutation hook:
Locked.tsx
Locked.tsximport { useCurrentAccount, useSuiClientQuery } from "@mysten/dapp-kit";
import { SuiObjectDisplay } from "@/components/SuiObjectDisplay";
import { Button } from "@radix-ui/themes";
import {
ArrowDownIcon,
ArrowUpIcon,
LockOpen1Icon,
} from "@radix-ui/react-icons";
import { ExplorerLink } from "../../ExplorerLink";
import { useState } from "react";
import { ApiLockedObject } from "@/types/types";
import { useUnlockMutation } from "@/mutations/locked";
/**
* Prefer to use the `Locked` component only through `LockedObject`.
*
* This can also render data directly from the API, but we prefer
* to also validate ownership from on-chain state (as objects are transferrable)
* and the API cannot track all the ownership changes.
*/
export function Locked({
locked,
hideControls,
}: {
locked: ApiLockedObject;
hideControls?: boolean;
}) {
const [isToggled, setIsToggled] = useState(false);
const account = useCurrentAccount();
const { mutate: unlockMutation, isPending } = useUnlockMutation();
const suiObject = useSuiClientQuery(
"getObject",
{
id: locked.itemId,
options: {
showDisplay: true,
showType: true,
showOwner: true,
},
},
{
select: (data) => data.data,
},
);
const isOwner = () => {
return !!locked.creator && account?.address === locked.creator;
};
const getLabel = () => {
if (locked.deleted) return "Deleted";
if (hideControls) {
if (locked.creator === account?.address) return "You offer this";
return "You'll receive this if accepted";
}
return undefined;
};
const getLabelClasses = () => {
if (locked.deleted)
return "bg-red-50 rounded px-3 py-1 text-sm text-red-500";
if (hideControls) {
if (!!locked.creator && locked.creator === account?.address)
return "bg-blue-50 rounded px-3 py-1 text-sm text-blue-500";
return "bg-green-50 rounded px-3 py-1 text-sm text-green-700";
}
return undefined;
};
return (
<SuiObjectDisplay
object={suiObject.data!}
label={getLabel()}
labelClasses={getLabelClasses()}
>
<div className="p-4 pt-1 text-right flex flex-wrap items-center justify-between">
{
<p className="text-sm flex-shrink-0 flex items-center gap-2">
<ExplorerLink id={locked.objectId} isAddress={false} />
</p>
}
{!hideControls && isOwner() && (
<Button
className="ml-auto cursor-pointer"
disabled={isPending}
onClick={() => {
unlockMutation({
lockedId: locked.objectId,
keyId: locked.keyId,
suiObject: suiObject.data!,
});
}}
>
<LockOpen1Icon /> Unlock
</Button>
)}
</div>
</SuiObjectDisplay>
);
}
Run your app and ensure you can:
- Unlock a locked object.
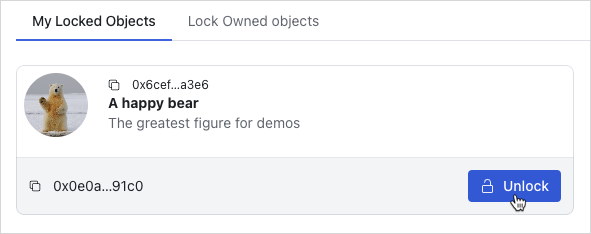
Display locked objects to escrow
Update src/routes/EscrowDashboard.tsx to include the LockedList component:
EscrowDashboard.tsx
EscrowDashboard.tsximport { useState } from "react";
import { Tabs, Tooltip } from "@radix-ui/themes";
import { LockedList } from "../components/locked/ApiLockedList";
import { InfoCircledIcon } from "@radix-ui/react-icons";
export function EscrowDashboard() {
const tabs = [
{
name: "Browse Locked Objects",
component: () => (
<LockedList
params={{
deleted: "false",
}}
enableSearch
/>
),
tooltip: "Browse locked objects you can trade for.",
},
];
const [tab, setTab] = useState(tabs[0].name);
return (
<Tabs.Root value={tab} onValueChange={setTab}>
<Tabs.List>
{tabs.map((tab, index) => {
return (
<Tabs.Trigger
key={index}
value={tab.name}
className="cursor-pointer"
>
{tab.name}
<Tooltip content={tab.tooltip}>
<InfoCircledIcon className="ml-3" />
</Tooltip>
</Tabs.Trigger>
);
})}
</Tabs.List>
{tabs.map((tab, index) => {
return (
<Tabs.Content key={index} value={tab.name}>
{tab.component()}
</Tabs.Content>
);
})}
</Tabs.Root>
);
}
Add src/components/locked/ApiLockedList.tsx:
ApiLockedList.tsx
ApiLockedList.tsximport { useInfiniteQuery } from "@tanstack/react-query";
import { CONSTANTS, QueryKey } from "@/constants";
import { InfiniteScrollArea } from "@/components/InfiniteScrollArea";
import { ApiLockedObject, LockedListingQuery } from "@/types/types";
import { constructUrlSearchParams, getNextPageParam } from "@/utils/helpers";
import { useSuiClient } from "@mysten/dapp-kit";
import { TextField } from "@radix-ui/themes";
import { useState } from "react";
import { LockedObject } from "./LockedObject";
import { useGetLockedObject } from "@/hooks/useGetLockedObject";
/**
* Fetches all the non-deleted system `Locked` objects from the API in a paginated fashion.
* Then, it proceeds into fetching the on-chain state, so we can better trust the latest
* state of the object in regards to ownership.
*
* We do this because `Locked` object has `store` ability, so that means that the `creator` field
* from the API could be stale.
*/
export function LockedList({
enableSearch,
params,
}: {
isPersonal?: boolean;
enableSearch?: boolean;
params: LockedListingQuery;
}) {
const [lockedId, setLockedId] = useState("");
const suiClient = useSuiClient();
const { data: searchData } = useGetLockedObject({
lockedId,
});
const { data, fetchNextPage, hasNextPage, isLoading, isFetchingNextPage } =
useInfiniteQuery({
initialPageParam: null,
queryKey: [QueryKey.Locked, params, lockedId],
queryFn: async ({ pageParam }) => {
/*
* Fetch the locked objects from the API.
*/
const data = await (
await fetch(
CONSTANTS.apiEndpoint +
"locked" +
constructUrlSearchParams({
deleted: "false",
...(pageParam ? { cursor: pageParam as string } : {}),
...(params || {}),
}),
)
).json();
/*
* Use the objectIds from the API to fetch the on-chain state. This is done to ensure that
* the ownership of each object is up-to-date.
*/
const objects = await suiClient.multiGetObjects({
ids: data.data.map((x: ApiLockedObject) => x.objectId),
options: {
showOwner: true,
showContent: true,
},
});
return {
suiObjects: objects.map((x) => x.data),
api: data,
};
},
select: (data) => data.pages,
getNextPageParam,
enabled: !lockedId,
});
/**
* Returns all `Locked` objects or the one that matches the search query if it exists.
*/
const suiObjects = () => {
if (lockedId) {
if (
!searchData?.data?.type?.startsWith(CONSTANTS.escrowContract.lockedType)
)
return [];
return [searchData?.data!];
}
return data?.flatMap((x) => x.suiObjects) || [];
};
const apiData = () => {
return data?.flatMap((x) => x.api.data);
};
// Find the itemID from the API request to skip fetching the DF on-chain.
// We can always be certain that the itemID can't change for a given `Locked` object.
const getItemId = (objectId?: string) => {
return apiData()?.find((x) => x.objectId === objectId)?.itemId;
};
return (
<>
{enableSearch && (
<TextField.Root
className="mt-3"
placeholder="Search by locked id"
value={lockedId}
onChange={(e) => setLockedId(e.target.value)}
></TextField.Root>
)}
<InfiniteScrollArea
loadMore={() => fetchNextPage()}
hasNextPage={hasNextPage}
loading={isFetchingNextPage || isLoading}
>
{suiObjects().map((object) => (
<LockedObject
key={object?.objectId!}
object={object!}
itemId={getItemId(object?.objectId)}
/>
))}
</InfiniteScrollArea>
</>
);
}
This hook fetches all the non-deleted system Locked objects from the API in a paginated fashion. Then, it proceeds into fetching the on-chain state, to ensure the latest state of the object is displayed.
This component uses tanstack's useInfiniteQuery instead of useSuiClientInfiniteQuery since the data is being fetched from the example's API rather than Sui.
Add src/hooks/useGetLockedObject.ts
src/hooks/useGetLockedObject.tsimport { useSuiClientQuery } from "@mysten/dapp-kit";
/**
* A re-usable hook for querying a locked object by ID
* from the on-chain state.
*/
export function useGetLockedObject({ lockedId }: { lockedId: string }) {
return useSuiClientQuery(
"getObject",
{
id: lockedId,
options: {
showType: true,
showOwner: true,
showContent: true,
},
},
{
enabled: !!lockedId,
},
);
}
Run your app and ensure you can:
- View the locked objects in the
Browse Locked Objectstab in theEscrowspage.
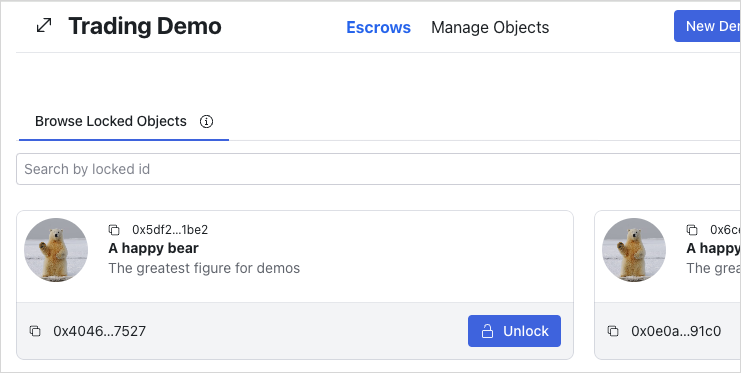
Create escrows
To create escrows, include a mutating function through the useCreateEscrowMutation hook in src/mutations/escrow.ts. It accepts the escrowed item to be traded and the ApiLockedObject from another party as parameters. Then, call the {PACKAGE_ID}::shared::create Move function and provide the escrowed item, the key id of the locked object to exchange, and the recipient of the escrow (locked object's owner).
escrow.ts
escrow.tsimport { CONSTANTS } from "@/constants";
import { useTransactionExecution } from "@/hooks/useTransactionExecution";
import { ApiLockedObject } from "@/types/types";
import { useCurrentAccount } from "@mysten/dapp-kit";
import { SuiObjectData } from "@mysten/sui/client";
import { Transaction } from "@mysten/sui/transactions";
import { useMutation } from "@tanstack/react-query";
/**
* Builds and executes the PTB to create an escrow.
*/
export function useCreateEscrowMutation() {
const currentAccount = useCurrentAccount();
const executeTransaction = useTransactionExecution();
return useMutation({
mutationFn: async ({
object,
locked,
}: {
object: SuiObjectData;
locked: ApiLockedObject;
}) => {
if (!currentAccount?.address)
throw new Error("You need to connect your wallet!");
const txb = new Transaction();
txb.moveCall({
target: `${CONSTANTS.escrowContract.packageId}::shared::create`,
arguments: [
txb.object(object.objectId!),
txb.pure.id(locked.keyId),
txb.pure.address(locked.creator!),
],
typeArguments: [object.type!],
});
return executeTransaction(txb);
},
});
}
Update src/components/locked/partials/Locked.tsx to include the useCreateEscrowMutation hook
src/components/locked/partials/Locked.tsx to include the useCreateEscrowMutation hookimport { useCurrentAccount, useSuiClientQuery } from "@mysten/dapp-kit";
import { SuiObjectDisplay } from "@/components/SuiObjectDisplay";
import { Button } from "@radix-ui/themes";
import {
ArrowDownIcon,
ArrowUpIcon,
LockOpen1Icon,
} from "@radix-ui/react-icons";
import { ExplorerLink } from "../../ExplorerLink";
import { useState } from "react";
import { ApiLockedObject } from "@/types/types";
import { CreateEscrow } from "../../escrows/CreateEscrow";
import { useUnlockMutation } from "@/mutations/locked";
/**
* Prefer to use the `Locked` component only through `LockedObject`.
*
* This can also render data directly from the API, but we prefer
* to also validate ownership from on-chain state (as objects are transferrable)
* and the API cannot track all the ownership changes.
*/
export function Locked({
locked,
hideControls,
}: {
locked: ApiLockedObject;
hideControls?: boolean;
}) {
const [isToggled, setIsToggled] = useState(false);
const account = useCurrentAccount();
const { mutate: unlockMutation, isPending } = useUnlockMutation();
const suiObject = useSuiClientQuery(
"getObject",
{
id: locked.itemId,
options: {
showDisplay: true,
showType: true,
showOwner: true,
},
},
{
select: (data) => data.data,
},
);
const isOwner = () => {
return !!locked.creator && account?.address === locked.creator;
};
const getLabel = () => {
if (locked.deleted) return "Deleted";
if (hideControls) {
if (locked.creator === account?.address) return "You offer this";
return "You'll receive this if accepted";
}
return undefined;
};
const getLabelClasses = () => {
if (locked.deleted)
return "bg-red-50 rounded px-3 py-1 text-sm text-red-500";
if (hideControls) {
if (!!locked.creator && locked.creator === account?.address)
return "bg-blue-50 rounded px-3 py-1 text-sm text-blue-500";
return "bg-green-50 rounded px-3 py-1 text-sm text-green-700";
}
return undefined;
};
return (
<SuiObjectDisplay
object={suiObject.data!}
label={getLabel()}
labelClasses={getLabelClasses()}
>
<div className="p-4 pt-1 text-right flex flex-wrap items-center justify-between">
{
<p className="text-sm flex-shrink-0 flex items-center gap-2">
<ExplorerLink id={locked.objectId} isAddress={false} />
</p>
}
{!hideControls && isOwner() && (
<Button
className="ml-auto cursor-pointer"
disabled={isPending}
onClick={() => {
unlockMutation({
lockedId: locked.objectId,
keyId: locked.keyId,
suiObject: suiObject.data!,
});
}}
>
<LockOpen1Icon /> Unlock
</Button>
)}
{!hideControls && !isOwner() && (
<Button
className="ml-auto cursor-pointer bg-transparent text-black disabled:opacity-40"
disabled={!account?.address}
onClick={() => setIsToggled(!isToggled)}
>
Start Escrow
{isToggled ? <ArrowUpIcon /> : <ArrowDownIcon />}
</Button>
)}
{isToggled && (
<div className="min-w-[340px] w-full justify-self-start text-left">
<CreateEscrow locked={locked} />
</div>
)}
</div>
</SuiObjectDisplay>
);
}
Add src/components/escrows/CreateEscrow.tsx
src/components/escrows/CreateEscrow.tsximport { ApiLockedObject } from "@/types/types";
import { useCurrentAccount, useSuiClientInfiniteQuery } from "@mysten/dapp-kit";
import { formatAddress } from "@mysten/sui/utils";
import { Avatar, Button, Select } from "@radix-ui/themes";
import { InfiniteScrollArea } from "@/components/InfiniteScrollArea";
import { useState } from "react";
import { ExplorerLink } from "../ExplorerLink";
import { useCreateEscrowMutation } from "@/mutations/escrow";
/**
* A component that allows the user to create an escrow for a locked object.
* It fetches all the objects owned by the connected wallet address and allows the user to
* select one to put on escrow.
*/
export function CreateEscrow({ locked }: { locked: ApiLockedObject }) {
const [objectId, setObjectId] = useState<string | undefined>(undefined);
const account = useCurrentAccount();
const { mutate: createEscrowMutation, isPending } = useCreateEscrowMutation();
const { data, fetchNextPage, isFetchingNextPage, hasNextPage, refetch } =
useSuiClientInfiniteQuery(
"getOwnedObjects",
{
owner: account?.address!,
options: {
showDisplay: true,
showType: true,
},
},
{
enabled: !!account,
select: (data) =>
data.pages
.flatMap((page) => page.data)
.filter(
// we're filtering out objects that don't have Display or image_url
// for demo purposes. The Escrow contract works with all objects.
(x) => !!x.data?.display && !!x.data?.display?.data?.image_url,
),
},
);
const getObject = () => {
const object = data?.find((x) => x.data?.objectId === objectId);
if (!object || !object.data) {
return;
}
return object.data;
};
return (
<div className="px-3 py-3 grid grid-cols-1 gap-5 mt-3 rounded">
<div>
<label className="text-xs">The recipient will be:</label>
<ExplorerLink id={locked.creator!} isAddress />
</div>
<div>
<label className="text-xs">Select which object to put on escrow:</label>
<Select.Root value={objectId} onValueChange={setObjectId}>
<Select.Trigger
className="h-auto min-h-[25px] w-full mt-3 py-2"
placeholder="Pick an object"
/>
<Select.Content className="max-w-[550px] overflow-hidden">
<Select.Group>
<Select.Label>Select an Object</Select.Label>
<InfiniteScrollArea
loadMore={() => fetchNextPage()}
hasNextPage={hasNextPage}
loading={isFetchingNextPage}
gridClasses="grid-cols-1 gap-2"
>
{data?.map((object) => {
return (
<Select.Item
key={object.data?.objectId!}
value={object.data?.objectId!}
className="h-auto w-full data-[state=checked]:bg-blue-50 whitespace-pre-wrap overlfow-hidden break-words hover:bg-blue-50 bg-white text-black cursor-pointer"
>
<div className="flex items-center break-words">
<Avatar
size="2"
radius="medium"
fallback="*"
className="mr-3"
src={object.data?.display?.data?.image_url!}
/>
<div className="text-xs overflow-ellipsis">
{(object.data?.display?.data?.name || "-").substring(
0,
100,
)}
<p className="text-gray-600">
{formatAddress(object.data?.objectId!)}
</p>
</div>
</div>
</Select.Item>
);
})}
</InfiniteScrollArea>
</Select.Group>
</Select.Content>
</Select.Root>
</div>
{objectId && (
<div>
<label className="text-xs">You'll be offering:</label>
<ExplorerLink id={objectId} />
</div>
)}
<div className="text-right">
<Button
className="cursor-pointer"
disabled={isPending || !objectId}
onClick={() => {
createEscrowMutation(
{ locked, object: getObject()! },
{
onSuccess: () => {
refetch();
setObjectId(undefined);
},
},
);
}}
>
Create Escrow
</Button>
</div>
</div>
);
}
Run your app and ensure you can:
- Create an escrow.
The object should disappear from the list of locked objects in the Browse Locked Objects tab in the Escrows page. You view and accept or cancel escrows in later steps.
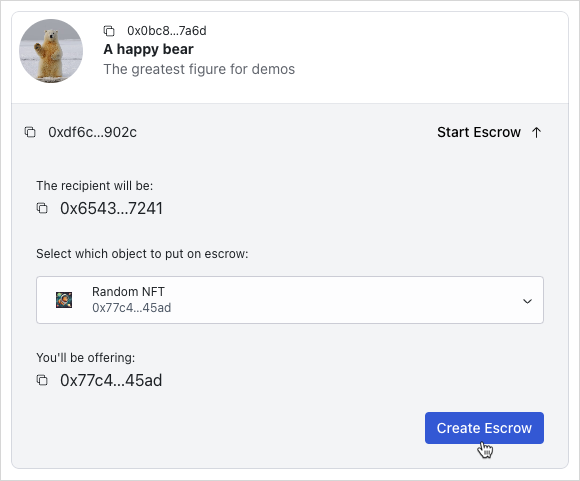
Cancel escrows
To cancel the escrow, create a mutation through the useCancelEscrowMutation hook in src/mutations/escrow.ts. The cancel function accepts the escrow ApiEscrowObject and its on-chain data. The {PACKAGE_ID}::shared::return_to_sender Move call is generic, thus it requires the type parameters of the escrowed object. Next, execute {PACKAGE_ID}::shared::return_to_sender and transfer the returned escrowed object to the creator of the escrow.
escrow.ts
escrow.tsimport { CONSTANTS, QueryKey } from "@/constants";
import { useTransactionExecution } from "@/hooks/useTransactionExecution";
import { ApiEscrowObject, ApiLockedObject } from "@/types/types";
import { useCurrentAccount } from "@mysten/dapp-kit";
import { SuiObjectData } from "@mysten/sui/client";
import { Transaction } from "@mysten/sui/transactions";
import { useMutation, useQueryClient } from "@tanstack/react-query";
/**
* Builds and executes the PTB to create an escrow.
*/
export function useCreateEscrowMutation() {
const currentAccount = useCurrentAccount();
const executeTransaction = useTransactionExecution();
return useMutation({
mutationFn: async ({
object,
locked,
}: {
object: SuiObjectData;
locked: ApiLockedObject;
}) => {
if (!currentAccount?.address)
throw new Error("You need to connect your wallet!");
const txb = new Transaction();
txb.moveCall({
target: `${CONSTANTS.escrowContract.packageId}::shared::create`,
arguments: [
txb.object(object.objectId!),
txb.pure.id(locked.keyId),
txb.pure.address(locked.creator!),
],
typeArguments: [object.type!],
});
return executeTransaction(txb);
},
});
}
/**
* Builds and executes the PTB to cancel an escrow.
*/
export function useCancelEscrowMutation() {
const currentAccount = useCurrentAccount();
const executeTransaction = useTransactionExecution();
const queryClient = useQueryClient();
return useMutation({
mutationFn: async ({
escrow,
suiObject,
}: {
escrow: ApiEscrowObject;
suiObject: SuiObjectData;
}) => {
if (!currentAccount?.address)
throw new Error("You need to connect your wallet!");
const txb = new Transaction();
const item = txb.moveCall({
target: `${CONSTANTS.escrowContract.packageId}::shared::return_to_sender`,
arguments: [txb.object(escrow.objectId)],
typeArguments: [suiObject?.type!],
});
txb.transferObjects([item], txb.pure.address(currentAccount?.address!));
return executeTransaction(txb);
},
onSuccess: () => {
setTimeout(() => {
queryClient.invalidateQueries({ queryKey: [QueryKey.Escrow] });
}, 1_000);
},
});
}
Add src/components/escrows/Escrow.tsx
src/components/escrows/Escrow.tsximport { useCurrentAccount, useSuiClientQuery } from "@mysten/dapp-kit";
import { SuiObjectDisplay } from "@/components/SuiObjectDisplay";
import { Button } from "@radix-ui/themes";
import {
ArrowDownIcon,
ArrowUpIcon,
Cross1Icon,
} from "@radix-ui/react-icons";
import { CONSTANTS, QueryKey } from "@/constants";
import { ExplorerLink } from "../ExplorerLink";
import { useQuery } from "@tanstack/react-query";
import { useState } from "react";
import { ApiEscrowObject } from "@/types/types";
import {
useCancelEscrowMutation,
} from "@/mutations/escrow";
import { useGetLockedObject } from "@/hooks/useGetLockedObject";
import { LockedObject } from "../locked/LockedObject";
/**
* A component that displays an escrow and allows the user to accept or cancel it.
* Accepts an `escrow` object as returned from the API.
*/
export function Escrow({ escrow }: { escrow: ApiEscrowObject }) {
const account = useCurrentAccount();
const [isToggled, setIsToggled] = useState(true);
const { mutate: cancelEscrowMutation, isPending: pendingCancellation } =
useCancelEscrowMutation();
const suiObject = useSuiClientQuery("getObject", {
id: escrow?.itemId,
options: {
showDisplay: true,
showType: true,
},
});
const lockedData = useQuery({
queryKey: [QueryKey.Locked, escrow.keyId],
queryFn: async () => {
const res = await fetch(
`${CONSTANTS.apiEndpoint}locked?keyId=${escrow.keyId}`,
);
return res.json();
},
select: (data) => data.data[0],
enabled: !escrow.cancelled,
});
const { data: suiLockedObject } = useGetLockedObject({
lockedId: lockedData.data?.objectId,
});
const getLabel = () => {
if (escrow.cancelled) return "Cancelled";
if (escrow.swapped) return "Swapped";
if (escrow.sender === account?.address) return "You offer this";
if (escrow.recipient === account?.address) return "You'll receive this";
return undefined;
};
const getLabelClasses = () => {
if (escrow.cancelled) return "text-red-500";
if (escrow.swapped) return "text-green-500";
if (escrow.sender === account?.address)
return "bg-blue-50 rounded px-3 py-1 text-sm text-blue-500";
if (escrow.recipient === account?.address)
return "bg-green-50 rounded px-3 py-1 text-sm text-green-700";
return undefined;
};
return (
<SuiObjectDisplay
object={suiObject.data?.data!}
label={getLabel()}
labelClasses={getLabelClasses()}
>
<div className="p-4 flex gap-3 flex-wrap">
{
<p className="text-sm flex-shrink-0 flex items-center gap-2">
<ExplorerLink id={escrow.objectId} isAddress={false} />
</p>
}
<Button
className="ml-auto cursor-pointer bg-transparent text-black"
onClick={() => setIsToggled(!isToggled)}
>
Details
{isToggled ? <ArrowUpIcon /> : <ArrowDownIcon />}
</Button>
{!escrow.cancelled &&
!escrow.swapped &&
escrow.sender === account?.address && (
<Button
color="amber"
className="cursor-pointer"
disabled={pendingCancellation}
onClick={() =>
cancelEscrowMutation({
escrow,
suiObject: suiObject.data?.data!,
})
}
>
<Cross1Icon />
Cancel request
</Button>
)}
{isToggled && lockedData.data && (
<div className="min-w-[340px] w-full justify-self-start text-left">
{suiLockedObject?.data && (
<LockedObject
object={suiLockedObject.data}
itemId={lockedData.data.itemId}
hideControls
/>
)}
{!lockedData.data.deleted &&
escrow.recipient === account?.address && (
<div className="text-right mt-5">
<p className="text-xs pb-3">
When accepting the exchange, the escrowed item is
transferred to you and your locked item is transferred
to the sender.
</p>
</div>
)}
{lockedData.data.deleted &&
!escrow.swapped &&
escrow.recipient === account?.address && (
<div>
<p className="text-red-500 text-sm py-2 flex items-center gap-3">
<Cross1Icon />
The locked object has been deleted so you can't accept this
anymore.
</p>
</div>
)}
</div>
)}
</div>
</SuiObjectDisplay>
);
}
Add src/components/escrows/EscrowList.tsx
src/components/escrows/EscrowList.tsximport { useInfiniteQuery } from "@tanstack/react-query";
import { CONSTANTS, QueryKey } from "@/constants";
import { Escrow } from "./Escrow";
import { InfiniteScrollArea } from "@/components/InfiniteScrollArea";
import { constructUrlSearchParams, getNextPageParam } from "@/utils/helpers";
import { ApiEscrowObject, EscrowListingQuery } from "@/types/types";
import { useState } from "react";
import { TextField } from "@radix-ui/themes";
/**
* A component that fetches and displays a list of escrows.
* It works by using the API to fetch them, and can be re-used with different
* API params, as well as an optional search by escrow ID functionality.
*/
export function EscrowList({
params,
enableSearch,
}: {
params: EscrowListingQuery;
enableSearch?: boolean;
}) {
const [escrowId, setEscrowId] = useState("");
const { data, fetchNextPage, hasNextPage, isLoading, isFetchingNextPage } =
useInfiniteQuery({
initialPageParam: null,
queryKey: [QueryKey.Escrow, params, escrowId],
queryFn: async ({ pageParam }) => {
const data = await fetch(
CONSTANTS.apiEndpoint +
"escrows" +
constructUrlSearchParams({
...params,
...(pageParam ? { cursor: pageParam as string } : {}),
...(escrowId ? { objectId: escrowId } : {}),
}),
);
return data.json();
},
select: (data) => data.pages.flatMap((page) => page.data),
getNextPageParam,
});
return (
<div>
{enableSearch && (
<TextField.Root
placeholder="Search by escrow id"
value={escrowId}
onChange={(e) => setEscrowId(e.target.value)}
/>
)}
<InfiniteScrollArea
loadMore={() => fetchNextPage()}
hasNextPage={hasNextPage}
loading={isFetchingNextPage || isLoading}
>
{data?.map((escrow: ApiEscrowObject) => (
<Escrow key={escrow.itemId} escrow={escrow} />
))}
</InfiniteScrollArea>
</div>
);
}
Update src/routes/EscrowDashboard.tsx to include the EscrowList component
src/routes/EscrowDashboard.tsx to include the EscrowList componentimport { useState } from "react";
import { Tabs, Tooltip } from "@radix-ui/themes";
import { LockedList } from "../components/locked/ApiLockedList";
import { EscrowList } from "../components/escrows/EscrowList";
import { InfoCircledIcon } from "@radix-ui/react-icons";
import { useCurrentAccount } from "@mysten/dapp-kit";
export function EscrowDashboard() {
const account = useCurrentAccount();
const tabs = [
{
name: "Browse Locked Objects",
component: () => (
<LockedList
params={{
deleted: "false",
}}
enableSearch
/>
),
tooltip: "Browse locked objects you can trade for.",
},
{
name: "My Pending Requests",
component: () => (
<EscrowList
params={{
sender: account?.address,
swapped: "false",
cancelled: "false",
}}
enableSearch
/>
),
tooltip: "Escrows you have initiated for third party locked objects.",
},
];
const [tab, setTab] = useState(tabs[0].name);
return (
<Tabs.Root value={tab} onValueChange={setTab}>
<Tabs.List>
{tabs.map((tab, index) => {
return (
<Tabs.Trigger
key={index}
value={tab.name}
className="cursor-pointer"
>
{tab.name}
<Tooltip content={tab.tooltip}>
<InfoCircledIcon className="ml-3" />
</Tooltip>
</Tabs.Trigger>
);
})}
</Tabs.List>
{tabs.map((tab, index) => {
return (
<Tabs.Content key={index} value={tab.name}>
{tab.component()}
</Tabs.Content>
);
})}
</Tabs.Root>
);
}
Run your app and ensure you can:
- View the escrows in the
My Pending Requeststab in theEscrowspage. - Cancel an escrow that you requested.
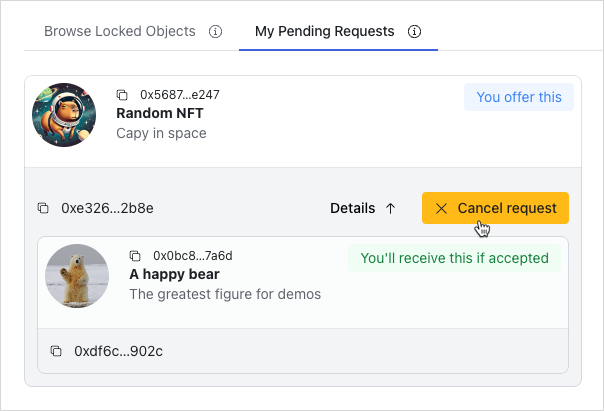
Accept escrows
To accept the escrow, create a mutation through the useAcceptEscrowMutation hook in src/mutations/escrow.ts. The implementation should be fairly familiar to you now. The accept function accepts the escrow ApiEscrowObject and the locked object ApiLockedObject. The {PACKAGE_ID}::shared::swap Move call is generic, thus it requires the type parameters of the escrowed and locked objects. Query the objects details by using multiGetObjects on Sui client instance. Lastly, execute the {PACKAGE_ID}::shared::swap Move call and transfer the returned escrowed item to the connected wallet account. When the mutation succeeds, invalidate the cache to allow automatic re-fetch of the data.
escrow.ts
escrow.tsimport { CONSTANTS, QueryKey } from "@/constants";
import { useTransactionExecution } from "@/hooks/useTransactionExecution";
import { ApiEscrowObject, ApiLockedObject } from "@/types/types";
import { useCurrentAccount, useSuiClient } from "@mysten/dapp-kit";
import { SuiObjectData } from "@mysten/sui/client";
import { Transaction } from "@mysten/sui/transactions";
import { useMutation, useQueryClient } from "@tanstack/react-query";
/**
* Builds and executes the PTB to create an escrow.
*/
export function useCreateEscrowMutation() {
const currentAccount = useCurrentAccount();
const executeTransaction = useTransactionExecution();
return useMutation({
mutationFn: async ({
object,
locked,
}: {
object: SuiObjectData;
locked: ApiLockedObject;
}) => {
if (!currentAccount?.address)
throw new Error("You need to connect your wallet!");
const txb = new Transaction();
txb.moveCall({
target: `${CONSTANTS.escrowContract.packageId}::shared::create`,
arguments: [
txb.object(object.objectId!),
txb.pure.id(locked.keyId),
txb.pure.address(locked.creator!),
],
typeArguments: [object.type!],
});
return executeTransaction(txb);
},
});
}
/**
* Builds and executes the PTB to cancel an escrow.
*/
export function useCancelEscrowMutation() {
const currentAccount = useCurrentAccount();
const executeTransaction = useTransactionExecution();
const queryClient = useQueryClient();
return useMutation({
mutationFn: async ({
escrow,
suiObject,
}: {
escrow: ApiEscrowObject;
suiObject: SuiObjectData;
}) => {
if (!currentAccount?.address)
throw new Error("You need to connect your wallet!");
const txb = new Transaction();
const item = txb.moveCall({
target: `${CONSTANTS.escrowContract.packageId}::shared::return_to_sender`,
arguments: [txb.object(escrow.objectId)],
typeArguments: [suiObject?.type!],
});
txb.transferObjects([item], txb.pure.address(currentAccount?.address!));
return executeTransaction(txb);
},
onSuccess: () => {
setTimeout(() => {
queryClient.invalidateQueries({ queryKey: [QueryKey.Escrow] });
}, 1_000);
},
});
}
/**
* Builds and executes the PTB to accept an escrow.
*/
export function useAcceptEscrowMutation() {
const currentAccount = useCurrentAccount();
const client = useSuiClient();
const executeTransaction = useTransactionExecution();
const queryClient = useQueryClient();
return useMutation({
mutationFn: async ({
escrow,
locked,
}: {
escrow: ApiEscrowObject;
locked: ApiLockedObject;
}) => {
if (!currentAccount?.address)
throw new Error("You need to connect your wallet!");
const txb = new Transaction();
const escrowObject = await client.multiGetObjects({
ids: [escrow.itemId, locked.itemId],
options: {
showType: true,
},
});
const escrowType = escrowObject.find(
(x) => x.data?.objectId === escrow.itemId,
)?.data?.type;
const lockedType = escrowObject.find(
(x) => x.data?.objectId === locked.itemId,
)?.data?.type;
if (!escrowType || !lockedType) {
throw new Error("Failed to fetch types.");
}
const item = txb.moveCall({
target: `${CONSTANTS.escrowContract.packageId}::shared::swap`,
arguments: [
txb.object(escrow.objectId),
txb.object(escrow.keyId),
txb.object(locked.objectId),
],
typeArguments: [escrowType, lockedType],
});
txb.transferObjects([item], txb.pure.address(currentAccount.address));
return executeTransaction(txb);
},
onSuccess: () => {
setTimeout(() => {
queryClient.invalidateQueries({ queryKey: [QueryKey.Escrow] });
}, 1_000);
},
});
}
Update src/components/escrows/Escrow.tsx to include the useAcceptEscrowMutation hook
src/components/escrows/Escrow.tsx to include the useAcceptEscrowMutation hookimport { useCurrentAccount, useSuiClientQuery } from "@mysten/dapp-kit";
import { SuiObjectDisplay } from "@/components/SuiObjectDisplay";
import { Button } from "@radix-ui/themes";
import {
ArrowDownIcon,
ArrowUpIcon,
CheckCircledIcon,
Cross1Icon,
} from "@radix-ui/react-icons";
import { CONSTANTS, QueryKey } from "@/constants";
import { ExplorerLink } from "../ExplorerLink";
import { useQuery } from "@tanstack/react-query";
import { useState } from "react";
import { ApiEscrowObject } from "@/types/types";
import {
useAcceptEscrowMutation,
useCancelEscrowMutation,
} from "@/mutations/escrow";
import { useGetLockedObject } from "@/hooks/useGetLockedObject";
import { LockedObject } from "../locked/LockedObject";
/**
* A component that displays an escrow and allows the user to accept or cancel it.
* Accepts an `escrow` object as returned from the API.
*/
export function Escrow({ escrow }: { escrow: ApiEscrowObject }) {
const account = useCurrentAccount();
const [isToggled, setIsToggled] = useState(true);
const { mutate: acceptEscrowMutation, isPending } = useAcceptEscrowMutation();
const { mutate: cancelEscrowMutation, isPending: pendingCancellation } =
useCancelEscrowMutation();
const suiObject = useSuiClientQuery("getObject", {
id: escrow?.itemId,
options: {
showDisplay: true,
showType: true,
},
});
const lockedData = useQuery({
queryKey: [QueryKey.Locked, escrow.keyId],
queryFn: async () => {
const res = await fetch(
`${CONSTANTS.apiEndpoint}locked?keyId=${escrow.keyId}`,
);
return res.json();
},
select: (data) => data.data[0],
enabled: !escrow.cancelled,
});
const { data: suiLockedObject } = useGetLockedObject({
lockedId: lockedData.data?.objectId,
});
const getLabel = () => {
if (escrow.cancelled) return "Cancelled";
if (escrow.swapped) return "Swapped";
if (escrow.sender === account?.address) return "You offer this";
if (escrow.recipient === account?.address) return "You'll receive this";
return undefined;
};
const getLabelClasses = () => {
if (escrow.cancelled) return "text-red-500";
if (escrow.swapped) return "text-green-500";
if (escrow.sender === account?.address)
return "bg-blue-50 rounded px-3 py-1 text-sm text-blue-500";
if (escrow.recipient === account?.address)
return "bg-green-50 rounded px-3 py-1 text-sm text-green-700";
return undefined;
};
return (
<SuiObjectDisplay
object={suiObject.data?.data!}
label={getLabel()}
labelClasses={getLabelClasses()}
>
<div className="p-4 flex gap-3 flex-wrap">
{
<p className="text-sm flex-shrink-0 flex items-center gap-2">
<ExplorerLink id={escrow.objectId} isAddress={false} />
</p>
}
<Button
className="ml-auto cursor-pointer bg-transparent text-black"
onClick={() => setIsToggled(!isToggled)}
>
Details
{isToggled ? <ArrowUpIcon /> : <ArrowDownIcon />}
</Button>
{!escrow.cancelled &&
!escrow.swapped &&
escrow.sender === account?.address && (
<Button
color="amber"
className="cursor-pointer"
disabled={pendingCancellation}
onClick={() =>
cancelEscrowMutation({
escrow,
suiObject: suiObject.data?.data!,
})
}
>
<Cross1Icon />
Cancel request
</Button>
)}
{isToggled && lockedData.data && (
<div className="min-w-[340px] w-full justify-self-start text-left">
{suiLockedObject?.data && (
<LockedObject
object={suiLockedObject.data}
itemId={lockedData.data.itemId}
hideControls
/>
)}
{!lockedData.data.deleted &&
escrow.recipient === account?.address && (
<div className="text-right mt-5">
<p className="text-xs pb-3">
When accepting the exchange, the escrowed item will be
transferred to you and your locked item will be transferred
to the sender.
</p>
<Button
className="cursor-pointer"
disabled={isPending}
onClick={() =>
acceptEscrowMutation({
escrow,
locked: lockedData.data,
})
}
>
<CheckCircledIcon /> Accept exchange
</Button>
</div>
)}
{lockedData.data.deleted &&
!escrow.swapped &&
escrow.recipient === account?.address && (
<div>
<p className="text-red-500 text-sm py-2 flex items-center gap-3">
<Cross1Icon />
The locked object has been deleted so you can't accept this
anymore.
</p>
</div>
)}
</div>
)}
</div>
</SuiObjectDisplay>
);
}
Update src/routes/EscrowDashboard.tsx to include the EscrowList component
src/routes/EscrowDashboard.tsx to include the EscrowList componentimport { useState } from "react";
import { Tabs, Tooltip } from "@radix-ui/themes";
import { LockedList } from "../components/locked/ApiLockedList";
import { EscrowList } from "../components/escrows/EscrowList";
import { InfoCircledIcon } from "@radix-ui/react-icons";
import { useCurrentAccount } from "@mysten/dapp-kit";
export function EscrowDashboard() {
const account = useCurrentAccount();
const tabs = [
{
name: "Requested Escrows",
component: () => (
<EscrowList
params={{
recipient: account?.address,
swapped: "false",
cancelled: "false",
}}
/>
),
tooltip: "Escrows requested for your locked objects.",
},
{
name: "Browse Locked Objects",
component: () => (
<LockedList
params={{
deleted: "false",
}}
enableSearch
/>
),
tooltip: "Browse locked objects you can trade for.",
},
{
name: "My Pending Requests",
component: () => (
<EscrowList
params={{
sender: account?.address,
swapped: "false",
cancelled: "false",
}}
/>
),
tooltip: "Escrows you have initiated for third party locked objects.",
},
];
const [tab, setTab] = useState(tabs[0].name);
return (
<Tabs.Root value={tab} onValueChange={setTab}>
<Tabs.List>
{tabs.map((tab, index) => {
return (
<Tabs.Trigger
key={index}
value={tab.name}
className="cursor-pointer"
>
{tab.name}
<Tooltip content={tab.tooltip}>
<InfoCircledIcon className="ml-3" />
</Tooltip>
</Tabs.Trigger>
);
})}
</Tabs.List>
{tabs.map((tab, index) => {
return (
<Tabs.Content key={index} value={tab.name}>
{tab.component()}
</Tabs.Content>
);
})}
</Tabs.Root>
);
}
Run your app and ensure you can:
- Accept an escrow that someone else requested.
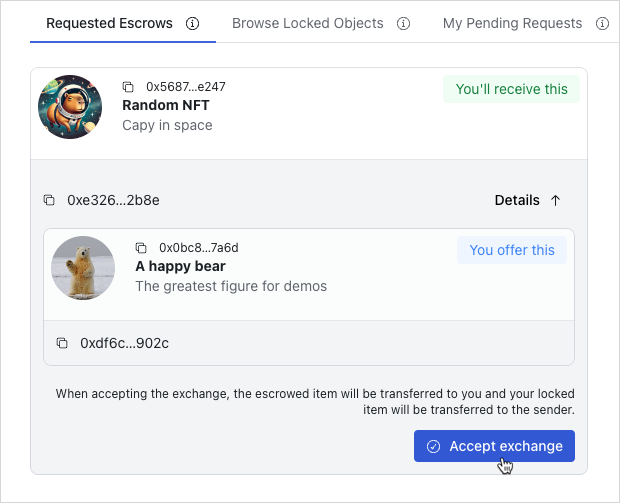
Finished frontend
At this point, you have a fully functional frontend that allows users to discover trades and interact with listed escrows. The UI is designed to be user-friendly and intuitive, allowing users to easily navigate and interact with the application. Have fun exploring the app and testing out the different features!